
Sundays were always my favorite growing up. That’s the day my grandma would make her famous Sweet Potato Stacks. I can still smell the fragrant spices wafting through the house as she expertly layered the thinly sliced sweet potatoes, blanketing them in a buttery, cinnamon-sugar topping.
My sister and I would watch in awe as Grandma assembled the stacks, gently pressing each layer to ensure perfect alignment. Then the waiting began – the anticipation was almost too much! When the timer finally beeped, the Sweet Potato Stacks emerged from the oven, golden and crispy on top. Grandma would carefully transfer them to plates, drizzling a bit of her homemade caramel sauce over the top. We’d dive in, savoring every bite of those heavenly sweet potato pillows. To this day, that flavor combination takes me right back to those cozy Sunday afternoons.
Why This Sweet Potato Stacks Recipe Will Become Your Go-To
Now that I’m all grown up, I’ve taken Grandma’s Sweet Potato Stacks recipe and put my own spin on it. Trust me, this isn’t your average sweet potato side dish. The secret is all in the technique – layering the potatoes into perfectly stacked towers, then baking them to crispy, caramelized perfection. The result is an irresistible balance of sweet, savory, and a touch of crunch in every bite. Once you try these Sweet Potato Stacks, they’re going to become a staple in your household, just like they are in mine.
The Secret Behind Perfect Sweet Potato Stacks
The key to nailing this Sweet Potato Stacks recipe is all about the slicing and stacking. You want to cut the sweet potatoes into super thin, even rounds – about 1/8 inch thick. This ensures they’ll bake up tender on the inside and crisp on the outside. Then it’s all about building those stacks with precision, gently pressing each layer to lock everything in place. The other secret? A mixture of brown sugar, cinnamon, and a pinch of salt to season the layers. As the stacks bake, that magical combo caramelizes into an addictive coating. Trust me, your taste buds are in for a real treat.
Essential Ingredients You’ll Need
- Sweet potatoes
- Unsalted butter
- Brown sugar
- Ground cinnamon
- Salt
- Caramel sauce (optional, for serving)
Step-by-Step Sweet Potato Stacks Instructions
Preparing Your Sweet Potato Stacks
Ready to get cooking? This Sweet Potato Stacks recipe is surprisingly simple, with just a handful of steps. You’ll need about 45 minutes total, including 35 minutes of bake time. All you’ll require is a sharp knife, a mandoline slicer (or very steady knife skills), a muffin tin, and a little bit of patience as you layer those potato rounds to perfection.
1- Preheat your oven to 400°F. Grease a 12-cup muffin tin with nonstick cooking spray.
2- Wash and peel the sweet potatoes. Using a mandoline slicer or a very sharp knife, slice the potatoes into 1/8-inch thick rounds.
3- In a small bowl, combine the brown sugar, cinnamon, and a pinch of salt.
4- Layer 4-5 sweet potato rounds in each muffin cup, pressing gently to compact them. Sprinkle a bit of the brown sugar mixture over each layer.
5- Continue layering the sweet potato rounds and brown sugar mixture, pressing firmly after each layer, until you reach the top of the muffin cup.
6- Bake for 35-40 minutes, until the sweet potato stacks are tender and the tops are crispy and caramelized. Allow to cool for 5 minutes before removing from the muffin tin.
Pro Tips for Success
The key to perfect Sweet Potato Stacks is all about even, thin slicing and compact layering. Use a mandoline slicer if you have one – it’ll give you those perfect 1/8-inch rounds every time. If slicing by hand, take it slow and try to keep the thickness as consistent as possible.
When building the stacks, really press down on each layer to compact the potatoes. This helps them hold their shape as they bake. And don’t be shy with that brown sugar-cinnamon mixture – it’s what gives the stacks their addictive caramelized topping.
Finally, keep an eye on them towards the end of baking. You want the tops to be crispy but not burned. If they’re getting too dark before the centers are tender, just loosely cover the muffin tin with foil.
Serving and Storing Your Sweet Potato Stacks
Perfect Pairings for Sweet Potato Stacks
These Sweet Potato Stacks make a fantastic side dish for all kinds of meals. They’d be an amazing accompaniment to roasted chicken, pork chops, or even grilled steak. And don’t be afraid to get creative – they’d also be delicious alongside a hearty vegetable curry or lentil stew.
For a sweet brunch, you could serve the stacks with a dollop of Greek yogurt and a drizzle of honey. Or for dessert, a scoop of vanilla ice cream and an extra drizzle of caramel sauce would be heavenly. Really, the possibilities are endless!
Storage and Make-Ahead Tips
Luckily, these Sweet Potato Stacks hold up beautifully. You can make them up to 3 days in advance and store them in an airtight container in the fridge. When you’re ready to serve, just pop them back in the oven at 350°F for 10-15 minutes to re-crisp the edges.
You can also freeze the baked stacks for up to 2 months. Let them thaw overnight in the fridge before reheating. And if you want to get a head start, you can even assemble the stacks in the muffin tin, cover, and refrigerate for up to 2 days before baking.
Variations and Dietary Adaptations for Sweet Potato Stacks
Creative Sweet Potato Stacks Variations
Once you master the basic Sweet Potato Stacks recipe, the fun really begins. Try swapping in different types of sweet potatoes – purple, white, or even a mix of colors for a stunning presentation.
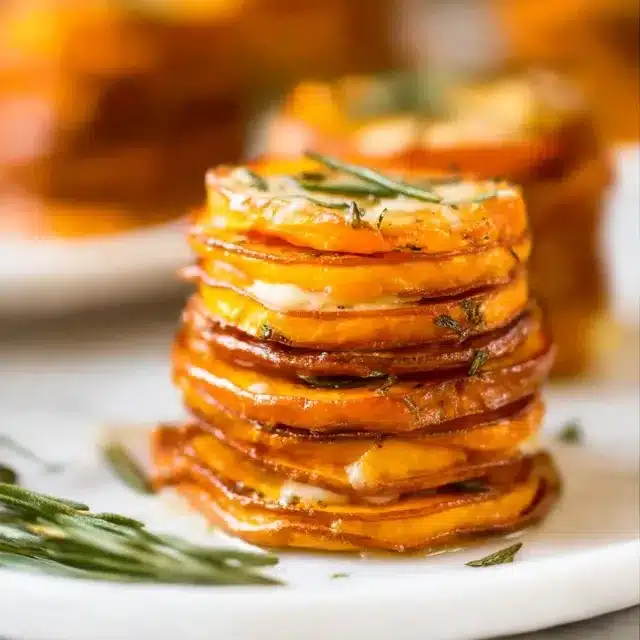
You could also play around with the seasoning blend, adding a pinch of nutmeg, ginger, or even a bit of cayenne for a kick of heat. Fresh herbs like rosemary or thyme would also be a delicious addition.
For the holidays, you could make mini Sweet Potato Stacks and serve them as an appetizer. Or take them over the top with a drizzle of melted chocolate or a sprinkle of crushed pecans.
Making Sweet Potato Stacks Diet-Friendly
These Sweet Potato Stacks are naturally gluten-free, and you can easily make them vegan by swapping the butter for coconut oil or plant-based butter. For a lower-carb version, use a mix of sweet potatoes and turnips or rutabagas.
If you’re watching your sugar intake, you can reduce the amount of brown sugar in the topping or even skip it altogether. The sweet potato slices have plenty of natural sweetness on their own. Just be sure to season generously with cinnamon, salt, and any other spices you enjoy.
Frequently Asked Questions
Q: Can I use a different type of potato besides sweet potatoes?
A: While you can certainly experiment with other potato varieties, sweet potatoes are really the star of this dish. Their natural sweetness and vibrant color is what makes these stacks so special. Regular potatoes would work, but they wouldn’t have the same flavor profile.
Q: How thin should I slice the sweet potatoes?
A: For the best texture, you’ll want to slice the sweet potatoes about 1/8 inch thick. Any thicker and they may not cook through properly. A mandoline slicer is the best tool for the job, but you can also use a very sharp knife and slice carefully.
Q: Can I make these Sweet Potato Stacks ahead of time?
A: Absolutely! These stacks actually hold up really well. You can bake them up to 3 days in advance and store them in the fridge. Just reheat them in a 350°F oven for 10-15 minutes before serving to re-crisp the edges.
Q: How many Sweet Potato Stacks does this recipe make?
A: This recipe will make 12 individual Sweet Potato Stacks, one per muffin cup. If you need to serve a larger crowd, you can easily double or triple the recipe.
Q: Help! My Sweet Potato Stacks are burning on top. What did I do wrong?
A: If the tops of your stacks are getting too dark before the centers are fully cooked, try loosely covering the muffin tin with foil for the last 10-15 minutes of baking. This will allow the insides to finish cooking without the outsides burning. You can also try lowering your oven temperature by 25°F.

Sweet Potato Stacks
- Total Time: 30
- Yield: 4 servings
- Diet: Vegetarian
Description
These crispy, caramelized sweet potato stacks are a delightful side dish or snack that’s ready in just 30 minutes. Packed with flavor and nutrition, they’re sure to become a new family favorite.
Ingredients
– 3 medium sweet potatoes, peeled and sliced into 1/4-inch rounds
– 2 tablespoons olive oil
– 1 teaspoon salt
– 1/2 teaspoon black pepper
– 1 tablespoon honey (optional)
– 2 tablespoons chopped fresh parsley (optional)
Instructions
1. 1. Preheat oven to 400°F (200°C). Line a baking sheet with parchment paper.
2. 2. In a large bowl, toss the sweet potato slices with olive oil, salt, and pepper until evenly coated.
3. 3. Arrange the sweet potato slices in stacks on the prepared baking sheet, ensuring they don’t touch.
4. 4. Bake for 20-25 minutes, flipping the stacks halfway, until the potatoes are tender and lightly browned on the edges.
5. 5. Remove from the oven and drizzle with honey (if using). Garnish with fresh parsley (if using).
6. 6. Serve the sweet potato stacks warm and enjoy!
Notes
For extra crispiness, you can broil the stacks for 2-3 minutes after baking. Be sure to watch them closely to prevent burning. These stacks also make a great base for various toppings, such as crumbled feta, bacon bits, or a dollop of sour cream.
- Prep Time: 10
- Cook Time: 20
- Category: Snacks & Desserts
- Method: Baking
- Cuisine: American
Conclusion
There’s just something so comforting and satisfying about these Sweet Potato Stacks. The combination of tender sweet potato, caramelized sugar, and a hint of cinnamon is truly unbeatable. I hope this recipe brings back memories of your own family’s favorite dishes, just like it does for me.
Once you try these Sweet Potato Stacks, I promise they’ll become a new household staple. They make a fantastic side dish, but you can also get creative and enjoy them as an appetizer or even a light dessert. Let me know how yours turn out in the comments below! And be sure to share this recipe with your loved ones – I have a feeling it’s going to be a real crowd-pleaser.