
Every year, as the leaves start to turn and the air gets crisp, I know it’s time to bring out my secret Spiderweb Brownies recipe. It’s a tradition that’s been passed down in my family for generations, and let me tell you, these Spiderweb Brownies are the talk of the town.
I remember the first time my grandma taught me how to make them. I was just a little girl, probably no more than 8 or 9 years old, and I was fascinated by the way the chocolate batter swirled and danced, creating these intricate, web-like patterns on the surface. Grandma would let me lick the spoon, and I’d giggle as the rich, fudgy goodness melted on my tongue. She’d smile and say, “These Spiderweb Brownies are magic, darling. They bring a little bit of that Halloween spirit into the kitchen, don’t they?”
And you know what? She was right. There’s just something so special about these Spiderweb Brownies. They’re the perfect treat to whip up for a cozy autumn gathering, or to enjoy on a chilly night while curled up with a good book. The key is in the technique – it takes a bit of practice, but once you’ve got it down, you’ll be making Spiderweb Brownies like a pro.
Why This Spiderweb Brownies Recipe Will Become Your Go-To
The Secret Behind Perfect Spiderweb Brownies
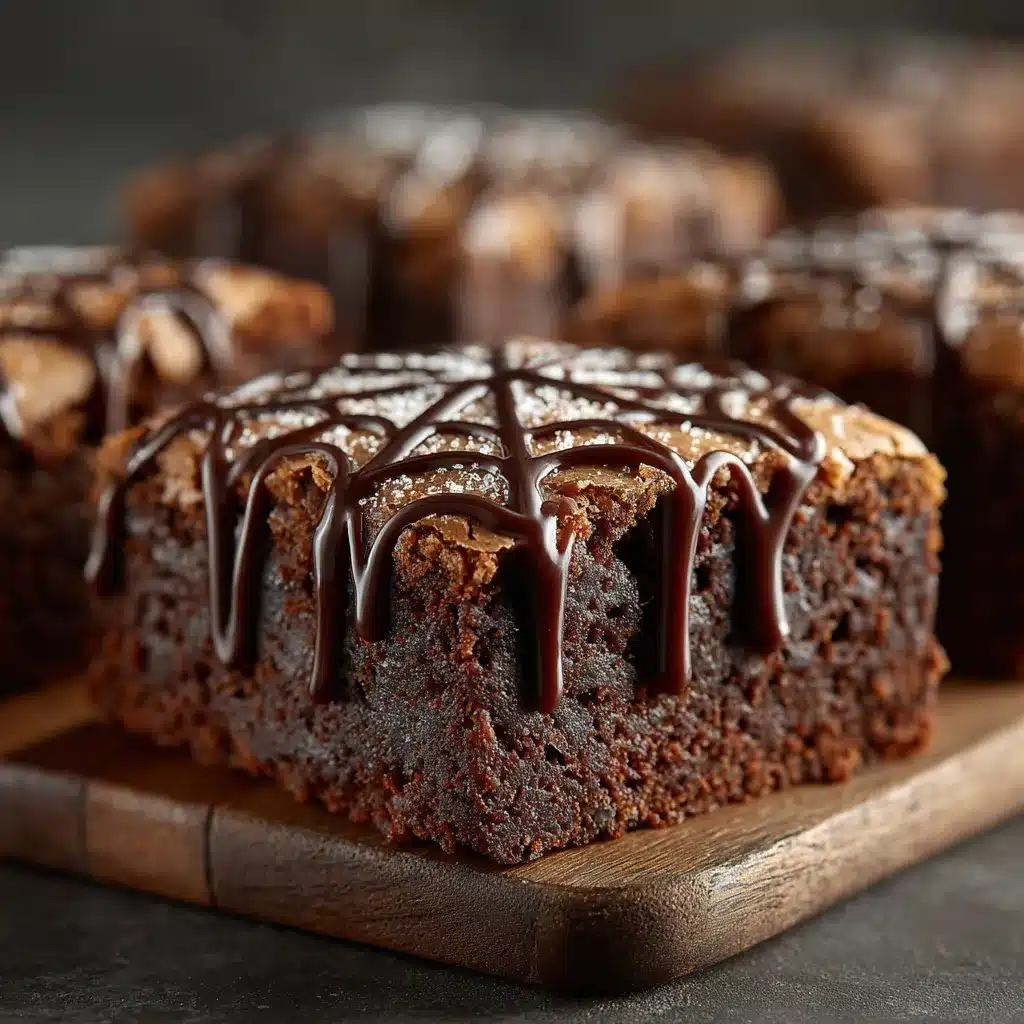
The secret to these Spiderweb Brownies lies in the way you swirl the batter. It’s a delicate dance, but once you get the hang of it, you’ll be creating these mesmerizing, web-like patterns with ease. The trick is to use a toothpick or a skewer to gently drag the batter in a circular motion, starting from the center and working your way out. It takes a bit of practice, but trust me, it’s so worth it. The result is a brownie that’s not only delicious, but also a showstopper on the dessert table.
Essential Ingredients You’ll Need
To make these Spiderweb Brownies, you’ll need:
- Unsweetened chocolate
- Butter
- Granulated sugar
- Eggs
- All-purpose flour
- Cocoa powder
- Salt
- Vanilla extract
The combination of rich, dark chocolate and the fluffy, fudgy texture is what makes these Spiderweb Brownies so irresistible. And don’t forget the secret ingredient – a pinch of salt, which helps to bring out all the other flavors and create that perfect balance.
Step-by-Step Spiderweb Brownies Instructions
Preparing Your Spiderweb Brownies
Baking these Spiderweb Brownies is a bit of a process, but trust me, it’s not as difficult as it might seem. You’ll need about an hour and a half from start to finish, and a few key pieces of equipment, like a large mixing bowl, a whisk, and a baking pan. But once you’ve got everything prepped and ready to go, the actual baking is a breeze.
1- Preheat your oven to 350°F and grease a 9×13-inch baking pan. This will ensure your Spiderweb Brownies release easily from the pan once they’re baked.
2- In a large microwave-safe bowl, melt the unsweetened chocolate and butter together, stirring occasionally until the mixture is smooth and completely combined.
3- Whisk in the granulated sugar until the mixture is well-blended, then add the eggs one at a time, mixing well after each addition. This will give your Spiderweb Brownies a rich, fudgy texture.
4- Sift the all-purpose flour, cocoa powder, and salt into the chocolate mixture, then gently fold everything together until just combined. Be careful not to overmix, as this can make the Spiderweb Brownies tough.
5- Spread the batter evenly into your prepared baking pan, then use a toothpick or a skewer to create the signature Spiderweb pattern on the surface. Start from the center and work your way out in a circular motion, gently dragging the batter to form the web-like design.
6- Bake the Spiderweb Brownies for 25-30 minutes, or until a toothpick inserted into the center comes out clean. Allow the brownies to cool completely before cutting into squares and serving.
Pro Tips for Success
The key to perfect Spiderweb Brownies is all in the technique. Be patient and take your time when swirling the batter – it may take a few tries to get the pattern just right. And don’t be afraid to get creative with the design! You can try different shapes and patterns to make each batch unique.
Another pro tip? Let the Spiderweb Brownies cool completely before cutting. This will help them hold their shape and make for clean, picture-perfect slices. And don’t forget to share your creations on social media – these Spiderweb Brownies are sure to be the talk of the town.
Serving and Storing Your Spiderweb Brownies
Perfect Pairings for Spiderweb Brownies
These Spiderweb Brownies are the perfect treat for all sorts of occasions. Serve them up at your next Halloween party, or enjoy them as a cozy after-dinner dessert on a chilly autumn evening. They also make a great addition to a holiday cookie tray or a homemade gift basket.
And let’s not forget the perfect pairing – a tall glass of cold milk or a hot cup of coffee. The rich, fudgy texture of the Spiderweb Brownies pairs perfectly with the creaminess of milk or the bold, comforting flavors of coffee.
Storage and Make-Ahead Tips
Spiderweb Brownies are the ultimate make-ahead treat. You can bake them up to a week in advance and store them in an airtight container at room temperature. They’ll stay fresh and delicious for up to 5 days.
If you want to get a head start on your holiday baking, you can even freeze the Spiderweb Brownies for up to 3 months. Just be sure to wrap them tightly in plastic wrap or aluminum foil to prevent freezer burn. When you’re ready to enjoy them, simply thaw at room temperature and they’ll be good as new.
Variations and Dietary Adaptations for Spiderweb Brownies
Creative Spiderweb Brownies Variations
While the classic Spiderweb Brownies are hard to beat, there are plenty of ways to put your own spin on this festive treat. Try adding a swirl of creamy peanut butter to the batter for a delicious twist. Or, for a seasonal touch, fold in some chopped walnuts or pecans.
You could also experiment with different types of chocolate – milk chocolate or white chocolate would both make for a tasty variation. And don’t be afraid to get creative with the spiderweb design, too. Try using a toothpick to create intricate patterns or even spell out a message on the surface of the brownies.
Making Spiderweb Brownies Diet-Friendly
For those looking to enjoy Spiderweb Brownies while sticking to a specific diet, there are a few easy substitutions you can make. To make them gluten-free, simply swap out the all-purpose flour for a gluten-free flour blend.
For a vegan version, use plant-based butter and replace the eggs with a flax or chia “egg” (1 tablespoon ground flax or chia seeds mixed with 3 tablespoons water). And if you’re watching your carbs, you can try using a sugar-free sweetener instead of granulated sugar.
No matter which version you choose, these Spiderweb Brownies are sure to be a hit. So grab your baking supplies and get ready to unleash your inner pastry chef!
Frequently Asked Questions
Q: Can I use a different type of chocolate besides unsweetened?
A: Absolutely! While unsweetened chocolate gives the Spiderweb Brownies a rich, intense flavor, you can experiment with other varieties like semisweet, dark, or even milk chocolate. Just keep in mind that the sweetness level will vary depending on the type of chocolate you use.
Q: How do I get the perfect swirl pattern on top?
A: The key is to work slowly and gently with a toothpick or skewer. Start from the center of the baking pan and make your way outward in a circular motion, lightly dragging the batter to create the web-like design. It may take a bit of practice, but you’ll get the hang of it in no time.
Q: Can I make Spiderweb Brownies ahead of time?
A: Yes, these brownies are perfect for making ahead! You can bake them up to a week in advance and store them in an airtight container at room temperature. They’ll stay fresh and delicious for up to 5 days. You can also freeze the Spiderweb Brownies for up to 3 months.
Q: How many Spiderweb Brownies does this recipe make?
A: This recipe for Spiderweb Brownies yields a 9×13-inch pan, which can be cut into 12-16 servings, depending on how you slice them. The rich, fudgy texture means that a little goes a long way, so you’ll definitely get plenty of treats out of one batch.
Q: What should I do if the spiderweb pattern doesn’t turn out right?
A: Don’t worry, it happens! If your Spiderweb Brownies don’t have the perfect web-like design, you can still enjoy them. The brownies will still taste delicious, even if the pattern isn’t quite as defined. You can also try tweaking your technique next time or get creative with a different swirl pattern.
Spiderweb Brownies
- Total Time: 35
- Yield: 16 servings
Description
Indulge in the rich, fudgy goodness of these Spiderweb Brownies – a festive Halloween treat that’s sure to cast a spell on your taste buds! With their intricate spider web design and decadent chocolate flavor, these easy-to-make brownies are a must-try for any Halloween celebration.
Ingredients
– 1 cup (2 sticks) unsalted butter, melted
– 2 cups granulated sugar
– 4 large eggs
– 1 cup all-purpose flour
– 3/4 cup unsweetened cocoa powder
– 1/2 teaspoon salt
– 1 teaspoon vanilla extract
– 1/4 cup chocolate chips (optional)
Instructions
1. 1. Preheat your oven to 350°F (175°C). Grease a 9×13-inch baking pan and set it aside.
2. 2. In a large bowl, whisk together the melted butter and sugar until well combined.
3. 3. Add the eggs one at a time, whisking well after each addition.
4. 4. In a separate bowl, sift together the flour, cocoa powder, and salt.
5. 5. Gradually fold the dry ingredients into the wet ingredients, mixing just until combined. Stir in the vanilla extract and chocolate chips (if using).
6. 6. Pour the batter into the prepared baking pan and smooth the top.
7. 7. Using a piping bag fitted with a small round tip, pipe a spiral pattern starting from the center of the pan and working outward to create a spider web design.
8. 8. Use a toothpick to gently swirl the batter, creating the spider web effect.
9. 9. Bake for 25-30 minutes, or until a toothpick inserted into the center comes out clean.
10. 10. Allow the brownies to cool completely before cutting and serving.
Notes
For a extra fudgy texture, use dark chocolate instead of semisweet. You can also add a pinch of cinnamon or chili powder for a subtle kick. These brownies can be stored in an airtight container at room temperature for up to 5 days.
- Prep Time: 10
- Cook Time: 25
- Category: Dessert
- Method: Baking
- Cuisine: American
Conclusion
There’s just something so magical about these Spiderweb Brownies. They’re the perfect way to celebrate the spooky season (or any time of year, really!) with their rich, fudgy goodness and that showstopping web-like design.
Whether you’re making them for a Halloween party, a cozy autumn gathering, or just because you’re craving a decadent treat, I guarantee these Spiderweb Brownies will become a new family favorite. So go ahead, give them a try – I promise you won’t be disappointed. And don’t forget to share your creations with me on social media! I can’t wait to see your spooky, delicious masterpieces.