
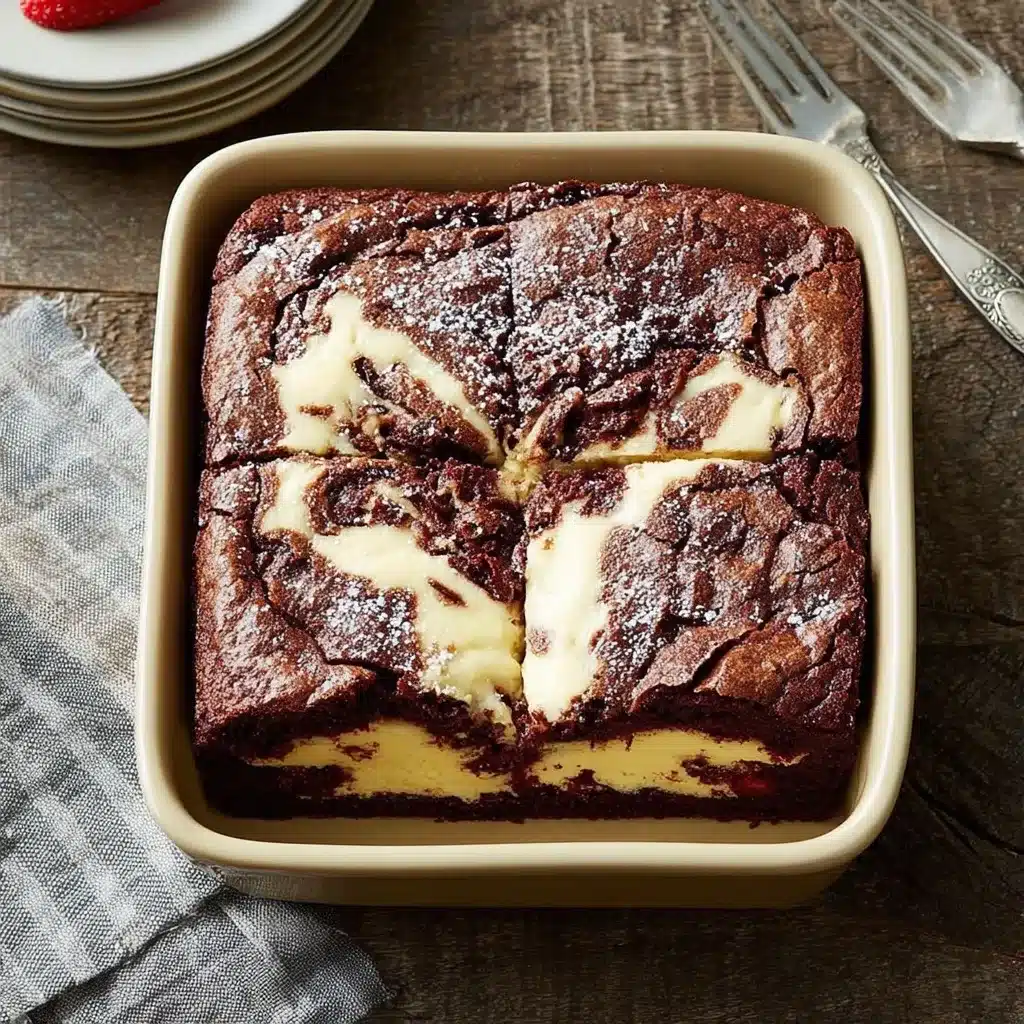
You know, I’ll never forget the first time I tried Red Velvet Earthquake Cake. It was during my cousin’s wedding a few years back, and the moment I took that first heavenly bite, I was hooked. The moist, rich red velvet cake paired with the decadent cream cheese swirls and crunchy pecan topping – it was absolute perfection. I still remember how my eyes lit up as the flavors danced on my tongue. From that day on, Red Velvet Earthquake Cake has become my go-to dessert for any special occasion.
Why This Red Velvet Earthquake Cake Recipe Will Become Your Go-To
There’s just something so unique and irresistible about this recipe. The secret? It’s all in the technique. See, most Red Velvet Earthquake Cakes can end up dry or overly dense, but this version is the perfect balance of moist and fluffy. And that swirled cream cheese filling? Absolute perfection. I like to think of it as the cake equivalent of a molten lava cake – gooey, indulgent, and utterly addictive.
The Secret Behind Perfect Red Velvet Earthquake Cake
The key is in the careful blending of the wet and dry ingredients. By following a specific method, you end up with a cake that’s light and airy on the outside, but rich and decadent on the inside. And let’s not forget the pecan topping – it adds the most amazing crunch that really takes this Red Velvet Earthquake Cake over the top.
Essential Ingredients You’ll Need
- Unsweetened cocoa powder: This is what gives the Red Velvet Earthquake Cake its signature deep red color and chocolate flavor.
- Buttermilk: The tanginess of the buttermilk helps to balance out the sweetness and keeps the cake incredibly moist.
- Cream cheese: For that signature swirled filling that takes this dessert to new heights of deliciousness.
- Pecans: Toasted to perfection, the pecans add a wonderful crunch and nuttiness.
Step-by-Step Red Velvet Earthquake Cake Instructions
Preparing Your Red Velvet Earthquake Cake
Ready to bake up a storm? This Red Velvet Earthquake Cake is surprisingly easy to make, and I promise, the end result is worth every minute. You’ll need about an hour and a half from start to finish, and the only equipment you’ll really need is a stand mixer and a couple of baking pans.
1- Start by preheating your oven to 350°F and greasing your baking pans. I like to use a 9×13 inch pan for this recipe.
2- In a large bowl, whisk together the dry ingredients – flour, cocoa powder, baking soda, and salt. Set this aside.
3- In the bowl of your stand mixer, cream together the butter and sugar until light and fluffy. Then, add in the eggs one at a time, beating well after each addition.
4- Slowly pour in the buttermilk and food coloring, mixing until the batter is smooth and vibrant red in color.
5- Carefully fold the dry ingredients into the wet ingredients, being careful not to overmix.
6- Pour half the batter into your prepared pan, then dollop the cream cheese mixture on top. Finish by pouring the remaining batter over the cream cheese and swirling it with a knife.
Pro Tips for Success
The key to nailing this Red Velvet Earthquake Cake is all about temperature control. Make sure your butter and cream cheese are at room temperature before you start, and be careful not to overbake. You want a toothpick to come out just barely clean when you test the cake. And don’t be afraid to get a little creative with the pecan topping – I like to toast mine lightly for extra flavor.
Serving and Storing Your Red Velvet Earthquake Cake
Perfect Pairings for Red Velvet Earthquake Cake
This Red Velvet Earthquake Cake is the perfect dessert for any special occasion. It’s decadent enough for a fancy dinner party, but easy enough to whip up for a cozy family gathering. I love serving it with a scoop of vanilla ice cream or a dollop of freshly whipped cream. And don’t forget the coffee – the rich chocolate flavors pair so beautifully with a hot cup of joe.
Storage and Make-Ahead Tips
The great news is, this Red Velvet Earthquake Cake keeps really well. You can store it in the fridge for up to 5 days, or pop it in the freezer for up to 3 months. Just make sure to let it thaw completely before serving. And if you want to get a head start, you can bake the cake layers in advance and assemble the day of. Just be sure to wrap them tightly in plastic wrap to keep them fresh.
Variations and Dietary Adaptations for Red Velvet Earthquake Cake
Creative Red Velvet Earthquake Cake Variations
While the classic version is tough to beat, there are so many ways to put your own spin on this recipe. Try swapping out the pecans for walnuts or almonds, or even adding in a handful of chocolate chips for an extra indulgent twist. You could also experiment with different flavors in the cream cheese filling – I’ve had delicious versions with everything from raspberry to salted caramel.
Making Red Velvet Earthquake Cake Diet-Friendly
If you’re looking to lighten things up, you can absolutely make a healthier version of this Red Velvet Earthquake Cake. Swap in Greek yogurt for the sour cream, use a sugar substitute in place of regular sugar, and opt for a plant-based cream cheese. You can also play around with gluten-free flour blends to make it celiac-friendly. Just be sure to adjust the baking time and temperature accordingly.
Frequently Asked Questions
Q: Can I use regular milk instead of buttermilk in this recipe?
A: I wouldn’t recommend it. The tanginess of the buttermilk is crucial for achieving the perfect texture and flavor in this Red Velvet Earthquake Cake. If you don’t have buttermilk on hand, you can make a quick substitute by mixing regular milk with a bit of lemon juice or vinegar.
Q: How do I know when the Red Velvet Earthquake Cake is done baking?
A: The key is to keep an eye on the cake and not to overbake. When a toothpick inserted in the center comes out with just a few moist crumbs, it’s ready to come out of the oven. The center should still look a bit jiggly, as it will continue to set as it cools.
Q: Can I make this Red Velvet Earthquake Cake ahead of time?
A: Absolutely! This cake actually gets even more moist and flavorful the next day. You can bake it up to 3 days in advance and store it in the fridge. Just make sure to cover it tightly with plastic wrap or foil to prevent it from drying out.
Q: How do I get that perfect swirled cream cheese filling?
A: The trick is to drop the cream cheese mixture by the spoonful over the cake batter, then use a knife to gently swirl it through. Avoid overmixing, as that can cause the filling to sink to the bottom.
Q: What if my Red Velvet Earthquake Cake cracks on top?
A: Don’t worry, a few cracks on top are totally normal and won’t affect the taste. If you want a picture-perfect cake, you can always cover any cracks with a dusting of powdered sugar or a drizzle of cream cheese frosting.
Indulgent Red Velvet Earthquake Cake
- Total Time: 50
- Yield: 12
Description
Discover the irresistible charm of this moist and decadent Red Velvet Earthquake Cake, a quick and comforting treat that’s sure to delight your senses.
Ingredients
– 2 cups all-purpose flour
– 2 cups granulated sugar
– 1/2 cup unsweetened cocoa powder
– 2 teaspoons baking soda
– 1 teaspoon salt
– 2 cups buttermilk
– 2 large eggs
– 1/2 cup vegetable oil
– 2 teaspoons vanilla extract
– 1 (8 ounce) package cream cheese, softened
– 1/2 cup unsalted butter, softened
– 4 cups confectioners’ sugar
Instructions
1. 1. Preheat oven to 350°F. Grease a 9×13-inch baking pan.
2. 2. In a large bowl, whisk together the flour, sugar, cocoa powder, baking soda, and salt.
3. 3. In a separate bowl, whisk together the buttermilk, eggs, oil, and vanilla.
4. 4. Pour the wet ingredients into the dry ingredients and stir until just combined.
5. 5. Pour the batter into the prepared baking pan.
6. 6. In a medium bowl, beat the cream cheese and butter until smooth. Gradually add the confectioners’ sugar and beat until well combined.
7. 7. Dollop the cream cheese mixture over the cake batter and use a knife to swirl it into the batter.
8. 8. Bake for 35-40 minutes, or until a toothpick inserted in the center comes out clean.
9. 9. Allow the cake to cool completely before serving.
Notes
For best results, use high-quality cocoa powder and full-fat buttermilk. The cream cheese swirl can be customized with different flavors or mix-ins. Store any leftover cake in the refrigerator.
- Prep Time: 15
- Cook Time: 35
- Category: Dessert
- Method: Baking
- Cuisine: American
Conclusion
There you have it – the ultimate Red Velvet Earthquake Cake recipe that’s sure to become a new family favorite. Trust me, once you try this moist, decadent, and downright delicious dessert, you’ll be hooked. So preheat your oven and get ready to bake up a storm. And don’t forget to share your creations with me – I’d love to hear how it turns out!