
Growing up in the heart of the South, pickled okra was a staple in our household. I can still vividly remember the days when my grandma would spend hours in the kitchen, carefully preparing her famous pickled okra recipe. The tantalizing aroma of the spices and vinegar would waft through the house, making our mouths water with anticipation.
As a child, I loved watching Grandma meticulously pack the fresh okra into jars, adding just the right amount of garlic, dill, and peppercorns. She’d then pour the flavorful brine over the top, sealing the jars tight. The waiting game was the hardest part – we’d have to let the pickled okra recipe sit for at least a week before we could dig in.
When the day finally came to crack open a jar, the anticipation was palpable. The first bite was always a revelation – the perfect balance of sour, salty, and slightly spicy. The crunchy texture of the okra combined with the tangy brine was simply divine. I’d savor each and every pickle, savoring the flavors that had been carefully crafted over the course of a week.
Those memories of Grandma’s pickled okra recipe have stayed with me for years, and it’s a dish I’ve come to cherish as an adult. That’s why I’m so excited to share my own take on this Southern classic with you. Trust me, this pickled okra recipe is going to become your new go-to.
Why This pickled okra recipe Recipe Will Become Your Go-To
The Secret Behind Perfect pickled okra recipe
What sets this pickled okra recipe apart is the unique blend of spices and the precise technique I’ve perfected over the years. Unlike some recipes that rely solely on vinegar for the brine, I’ve found that adding a touch of sugar and a few key aromatics takes the flavor to the next level.
The secret is in the balance – the sweetness of the sugar perfectly complements the tanginess of the vinegar, while the garlic, dill, and peppercorns lend a depth of flavor that you just can’t get from a store-bought jar. And by slicing the okra into bite-sized pieces, you end up with the perfect texture – crunchy yet tender, with each bite bursting with flavor.
Trust me, one taste of this pickled okra recipe, and you’ll be hooked. Your taste buds will thank you, and your friends and family will be begging you to share the recipe.
Essential Ingredients You’ll Need
To make this delectable pickled okra recipe, you’ll need the following ingredients:
Okra: Fresh, firm okra is a must. Look for pods that are about 4-5 inches long and free of blemishes.
Vinegar: I prefer to use a combination of apple cider vinegar and white vinegar, which gives the perfect balance of flavor.
Sugar: Just a touch of granulated sugar helps to balance the acidity of the vinegar.
Garlic: Freshly minced garlic adds a pungent, savory note.
Dill: Dried dill weed is the classic choice for pickled okra, but you can also use fresh dill if you have it on hand.
Peppercorns: Whole black peppercorns provide a gentle heat and a bit of earthy spice.
Salt: Kosher salt helps to season the brine and preserve the pickled okra.
Step-by-Step pickled okra recipe Instructions
Preparing Your pickled okra recipe
This pickled okra recipe is incredibly easy to make, and the hands-on time is minimal. In total, you’ll spend about 30 minutes prepping the ingredients and assembling the jars, and then you’ll need to let the pickles sit for at least a week before enjoying them.
You’ll need a few basic tools for this recipe, including a sharp knife, a cutting board, a large pot or saucepan, and some clean, sterilized jars with lids.
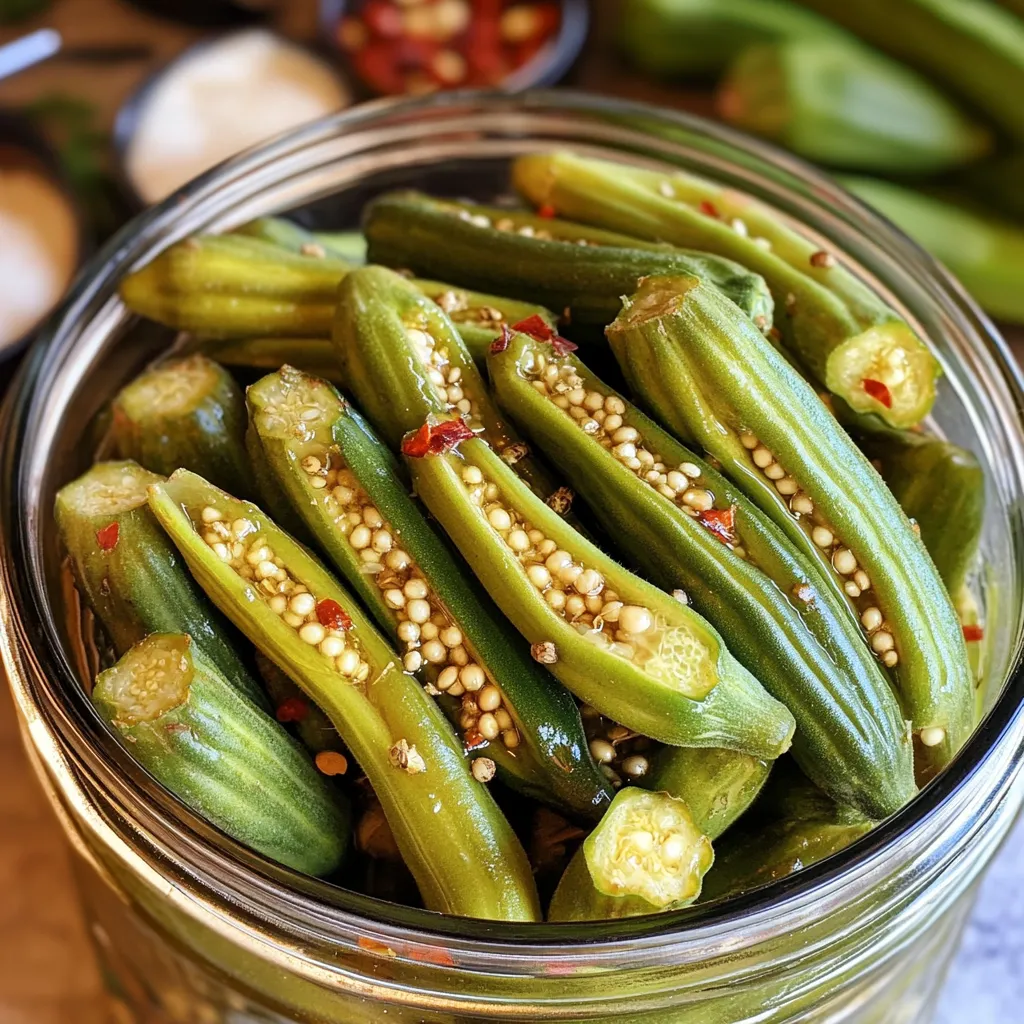
1- Start by thoroughly washing the fresh okra pods and patting them dry with a clean kitchen towel. Trim the stems off the top of each pod, being careful not to cut into the okra itself.
2- Slice the okra into bite-sized pieces, about 1/2 inch thick. This will help the brine penetrate the pods and ensure even pickling.
3- In a large pot, combine the vinegars, sugar, garlic, dill, peppercorns, and salt. Bring the mixture to a boil, stirring occasionally, until the sugar has fully dissolved.
4- Carefully pack the sliced okra into the clean, sterilized jars, making sure to leave about 1/2 inch of headspace at the top.
5- Pour the hot brine over the okra, filling the jars to the top. Tap the jars gently to remove any air bubbles.
6- Seal the jars tightly and let them cool to room temperature before refrigerating. For best flavor, let the pickled okra recipe sit for at least 1 week before enjoying.
Pro Tips for Success
To ensure your pickled okra recipe turns out perfectly every time, here are a few pro tips:
– Use the freshest, firmest okra you can find. Older, softer pods won’t pickle as well.
– Be sure to slice the okra evenly to promote even pickling.
– Don’t be tempted to skip the sugar – it’s an essential ingredient for balancing the acidity.
– Make sure your jars are thoroughly cleaned and sterilized before packing them with the okra and brine.
– Be patient! The pickled okra recipe needs at least a week to fully develop its flavor.
– Once pickled, the okra will keep for up to 6 months in the refrigerator.
Serving and Storing Your pickled okra recipe
Perfect Pairings for pickled okra recipe
Pickled okra is incredibly versatile and can be enjoyed in a variety of ways. As a Southern classic, it’s the perfect accompaniment to dishes like fried chicken, collard greens, and cornbread. But don’t stop there – these tangy, crunchy pickles also make a great addition to salads, sandwiches, and even bloody marys.
For a simple yet delicious appetizer, serve the pickled okra recipe with a selection of cheeses, crackers, and olives. Or, chop it up and mix it into a relish or salsa to top grilled fish or chicken. The possibilities are endless!
And don’t forget the beverages – these pickles pair beautifully with a cold, crisp beer or a refreshing gin and tonic. The acidity of the pickled okra recipe helps to cut through the richness of heavier dishes, making it a perfect palate cleanser.
Storage and Make-Ahead Tips
One of the best things about this pickled okra recipe is that it keeps incredibly well. Once the jars are sealed and refrigerated, the pickles will maintain their crunchy texture and bold flavor for up to 6 months.
In fact, this recipe is a great make-ahead option. You can prepare a big batch and have a steady supply of pickled okra on hand for quick snacks, easy side dishes, or last-minute guests. Just be sure to store the sealed jars in the refrigerator – this will help the pickles maintain their quality and prevent any spoilage.
When you’re ready to serve the pickled okra, simply remove a jar from the fridge and enjoy. The flavor actually gets better the longer the pickles sit, so don’t be afraid to let them hang out for a while before digging in.
Variations and Dietary Adaptations for pickled okra recipe
Creative pickled okra recipe Variations
While this classic pickled okra recipe is a real crowd-pleaser, there’s plenty of room for experimentation and personalization. One of my favorite variations is to add a few slices of fresh jalapeño to the jars for an extra kick of heat.
You can also play around with the spices, swapping out the dill for other fresh herbs like thyme or oregano. And for a more unique flavor profile, try incorporating warm spices like coriander, cumin, or even a touch of smoked paprika.
Seasonal produce can also be a great addition to pickled okra. In the summertime, try mixing in some sliced summer squash or cherry tomatoes. Or, for a heartier version, toss in some diced carrots or cauliflower florets.
The key is to have fun and get creative with your flavor combinations. Pickled okra is the perfect blank canvas for all sorts of culinary adventures.
Making pickled okra recipe Diet-Friendly
One of the best things about this pickled okra recipe is that it’s naturally gluten-free, vegan, and low in calories. That means it’s the perfect snack or side dish for a variety of dietary needs and preferences.
For those following a low-carb or keto diet, you can easily adapt the recipe by reducing or omitting the sugar altogether. The vinegar and spices will still provide plenty of flavor, and the okra itself is quite low in carbs.
And for our vegan friends, this pickled okra recipe is already plant-based, so you don’t need to make any special substitutions. Simply enjoy the tangy, crunchy pickles as-is.
No matter your dietary needs, this pickled okra recipe is sure to satisfy. It’s a versatile, flavorful, and nutritious addition to any meal or snack lineup.
Frequently Asked Questions
Q: Can I use a different type of vinegar besides apple cider and white?
A: Absolutely! Feel free to experiment with other vinegar varieties, such as red wine vinegar or champagne vinegar. Just keep in mind that the flavor profile may change slightly. The key is to use a high-quality, well-balanced vinegar that won’t overpower the other ingredients.
Q: How long do I need to let the pickled okra recipe sit before I can eat it?
A: For best flavor and texture, it’s recommended to let the pickled okra sit for at least 1 week before enjoying. This allows the brine to fully penetrate the okra and the flavors to meld together. However, you can start tasting the pickles after 5-7 days if you’re feeling impatient.
Q: Can I reuse the brine to pickle more okra?
A: Absolutely! The brine can be reused several times to pickle additional batches of okra. Just make sure to top it up with a bit of fresh vinegar, sugar, and spices as needed to maintain the proper flavor balance.
Q: How should I store the pickled okra recipe?
A: For maximum freshness and shelf life, store the sealed jars of pickled okra in the refrigerator. They’ll keep for up to 6 months this way. If you notice any signs of spoilage, such as mold or an off smell, it’s best to discard the pickles.
Q: What if my okra pieces aren’t submerged in the brine?
A: Don’t worry, this is a common issue. Simply use a small plate or other weight to gently press the okra down into the brine, ensuring all the pieces are fully submerged. This will help the pickles develop an even, consistent flavor.
Conclusion
Pickled okra is a Southern classic that deserves a spot in every home cook’s repertoire. This recipe is the perfect blend of tangy, salty, and slightly sweet, with a satisfying crunch in every bite. Whether you enjoy it as a snack, a side dish, or an ingredient in your favorite recipes, this pickled okra is sure to become a new family favorite.
So what are you waiting for? Gather your ingredients, follow the easy steps, and get ready to savor the taste of summer all year round. And don’t forget to let me know how your pickled okra recipe turns out – I’d love to hear your thoughts!