
Growing up in the heart of Music City, I have some of the fondest memories surrounding Nashville Hot Chicken Tenders. It was a rite of passage for any self-respecting Nashvillian to venture down to one of the legendary hot chicken joints and order up a plate of the spicy, crispy deliciousness. I can still vividly remember the first time I tried it – the sizzling hot tenders coated in a fiery red seasoning, served alongside slices of white bread to soak up all that glorious Nashville-style heat.
The aroma alone was enough to make my mouth water, and as I took that first bite, the flavors exploded on my tongue in a symphony of spice, crunch, and pure Southern comfort. It was love at first sight (or rather, first taste) and from that moment on, Nashville Hot Chicken Tenders became a staple in my diet, a go-to comfort food that never failed to satisfy.
Why This Nashville Hot Chicken Tenders Recipe Will Become Your Go-To
What sets this recipe apart is the perfect balance of flavors and textures. The tenders are brined in buttermilk to ensure they stay juicy and tender, then dredged in a seasoned flour mixture for an unbelievably crispy exterior. But the real star of the show is the signature Nashville Hot Chicken seasoning – a blend of spices that packs a serious punch of heat, but also delivers depth of flavor that goes far beyond your typical spicy chicken.
The Secret Behind Perfect Nashville Hot Chicken Tenders
The secret is all in the spice blend and the frying technique. By incorporating both cayenne pepper and hot paprika, you get that iconic fiery red hue and tongue-tingling heat that defines authentic Nashville Hot Chicken. And by double-frying the tenders, you end up with a shatteringly crisp crust that locks in all the juices for a truly outstanding texture.
Essential Ingredients You’ll Need
- Buttermilk – This is the key to super moist and tender chicken tenders.
- Boneless, skinless chicken tenders – You want bite-sized pieces that will fry up quickly.
- All-purpose flour – The base for the seasoned dredge.
- Cayenne pepper – Brings the signature Nashville-style heat.
- Hot paprika – Adds an extra layer of spice and that signature red color.
- Garlic powder, onion powder, and black pepper – For flavor complexity.
- Vegetable oil – For frying the tenders to crispy perfection.
Step-by-Step Nashville Hot Chicken Tenders Instructions
Preparing Your Nashville Hot Chicken Tenders
This Nashville Hot Chicken Tenders recipe is surprisingly simple to make at home, but it does require a bit of hands-on prep work. The total time from start to finish is around 45 minutes, and you’ll need a heavy-bottomed pot or Dutch oven for frying, as well as a few basic mixing bowls and tongs.
1- Start by cutting the chicken tenders into bite-sized pieces, about 2-3 inches long. Place them in a large bowl and cover with buttermilk, making sure each piece is fully submerged. Cover and refrigerate for at least 30 minutes, up to 4 hours.
2- In a shallow dish, whisk together the all-purpose flour, cayenne pepper, hot paprika, garlic powder, onion powder, and black pepper until well combined. This will be your seasoned dredge.
3- Heat 2-3 inches of vegetable oil in your heavy pot or Dutch oven to 350°F. Working in batches, remove the chicken tenders from the buttermilk, allowing any excess to drip off, then dredge them in the seasoned flour mixture until fully coated.
4- Carefully lower the floured tenders into the hot oil and fry for 2-3 minutes per batch, flipping halfway, until they’re golden brown and crispy. Adjust the heat as needed to maintain the 350°F temperature.
5- Transfer the fried tenders to a paper towel-lined plate or wire rack to drain any excess oil. While they’re still hot, generously sprinkle the tenders with the remaining Nashville Hot Chicken seasoning, making sure to coat them evenly on all sides.
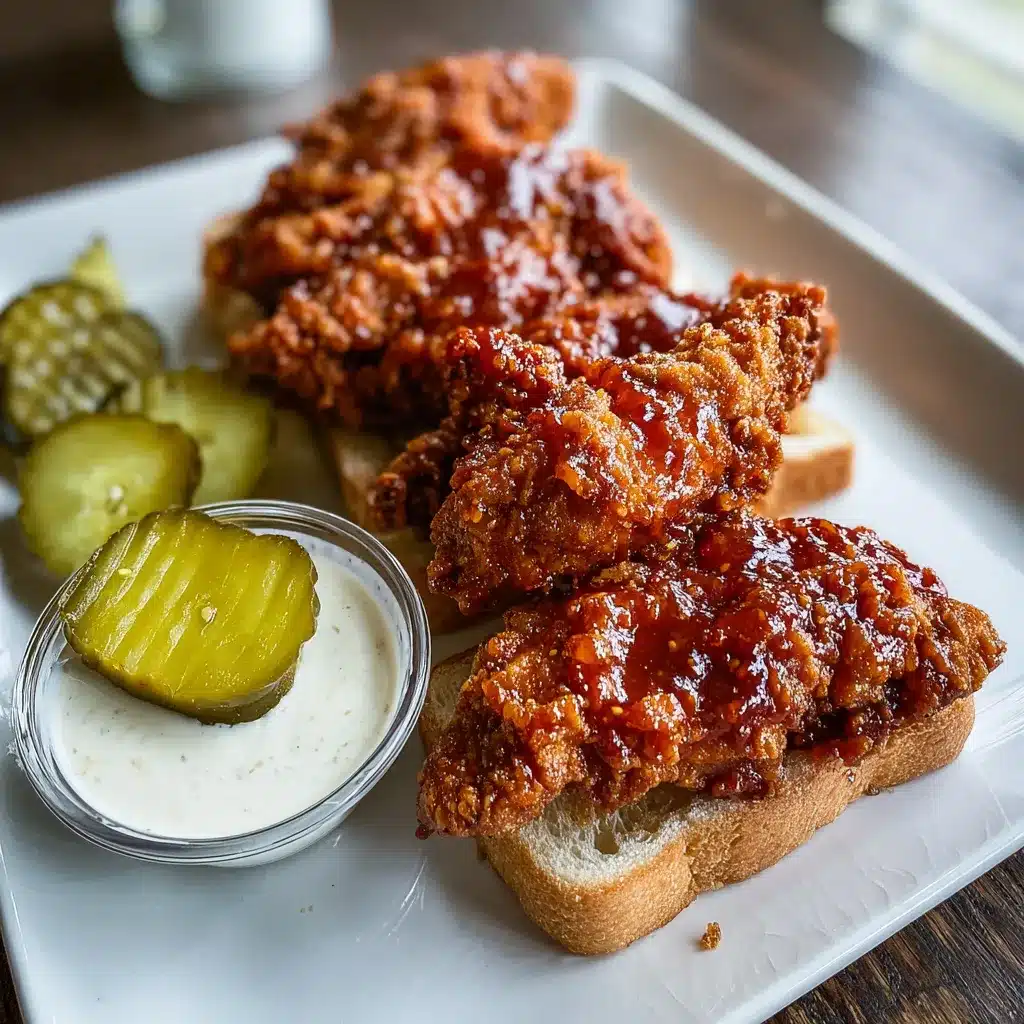
6- Serve the Nashville Hot Chicken Tenders immediately, with slices of white bread on the side to soak up all that delicious, spicy goodness. Enjoy!
Pro Tips for Success
The key to perfect Nashville Hot Chicken Tenders is in the details. Be sure to let the chicken soak in the buttermilk for at least 30 minutes to ensure maximum juiciness and tenderness. And don’t be shy with that seasoning blend – the more generously you coat the tenders, the more intense that iconic Nashville heat will be.
Another pro tip is to fry the chicken in small batches to maintain the ideal oil temperature. Overcrowding the pot can cause the oil to cool down too much, resulting in greasy, soggy tenders. And lastly, don’t forget to let the tenders drain on a paper towel-lined plate before seasoning – this helps the spices adhere better and prevents any excess oil from diluting the flavor.
Serving and Storing Your Nashville Hot Chicken Tenders
Perfect Pairings for Nashville Hot Chicken Tenders
No Nashville Hot Chicken Tenders feast would be complete without the classic accompaniments. Serve them alongside slices of white bread, which help to temper the heat and soak up all that spicy, flavorful goodness. A side of creamy coleslaw is also a must, providing a refreshing contrast to the fiery chicken.
And don’t forget the beverages – an ice-cold beer or sweet tea are both perfect pairings that can help extinguish the fire in your mouth (or at least provide a momentary respite!). For a more substantial meal, round out the plate with some crispy french fries or fluffy mashed potatoes.
Storage and Make-Ahead Tips
Leftover Nashville Hot Chicken Tenders can be stored in an airtight container in the refrigerator for up to 3 days. To reheat, place the tenders on a baking sheet in a 400°F oven for 5-10 minutes, until heated through and crispy again.
For make-ahead convenience, you can prepare the tenders through the frying step, then let them cool completely before transferring to a freezer-safe container or bag. When ready to serve, simply reheat the frozen tenders in a 400°F oven for 15-20 minutes, then toss with the Nashville Hot Chicken seasoning.
Variations and Dietary Adaptations for Nashville Hot Chicken Tenders
Creative Nashville Hot Chicken Tenders Variations
While the classic version is always a winner, there are plenty of ways to put your own spin on Nashville Hot Chicken Tenders. Try swapping out the chicken for boneless, skinless thighs for an even juicier and more flavorful bite. Or, for a lighter take, use chicken breasts instead.
You can also experiment with different spice blends – maybe add a touch of brown sugar for a hint of sweetness, or amp up the heat with some cayenne or Sriracha. And don’t be afraid to get creative with your dipping sauces, like a tangy buttermilk ranch or a cool, creamy avocado dip.
Making Nashville Hot Chicken Tenders Diet-Friendly
For those looking to make their Nashville Hot Chicken Tenders a bit more diet-friendly, there are a few easy substitutions you can try. Instead of traditional all-purpose flour, opt for a gluten-free flour blend or even almond flour for a low-carb version.
You can also bake the tenders instead of frying them – just coat them in the seasoned flour, place on a baking sheet, and bake at 400°F for 15-20 minutes, flipping halfway. This cuts down on the oil and calories, while still delivering that irresistible crunch.
And for the die-hard spice lovers out there, feel free to amp up the heat even further by adding extra cayenne or hot sauce to the seasoning blend. Just be sure to have some cooling dipping sauces on hand to balance out the fire!
Frequently Asked Questions
Q: Can I use chicken breasts instead of tenders?
A: Absolutely! Chicken breasts will work just as well, you’ll just need to cut them into smaller, bite-sized pieces before breading and frying.
Q: How can I make this recipe gluten-free?
A: Swap the all-purpose flour for a gluten-free flour blend. Almond flour or chickpea flour also work great for a low-carb option.
Q: Can I bake the Nashville Hot Chicken Tenders instead of frying?
A: Yes, you can definitely bake them! Coat the chicken in the seasoned flour, place on a baking sheet, and bake at 400°F for 15-20 minutes, flipping halfway.
Q: How long will the leftover tenders keep?
A: Stored in an airtight container in the fridge, the Nashville Hot Chicken Tenders will stay fresh for up to 3 days. For longer storage, they can be frozen for 2-3 months.
Q: Help! My tenders came out greasy – what did I do wrong?
A: Likely your oil temperature was too low. Make sure to maintain a consistent 350°F oil temperature and fry the tenders in small batches to prevent the oil from cooling down too much.

Nashville Hot Chicken Tenders
- Total Time: 35
- Yield: 4 servings
Description
Dive into the bold, spicy flavors of the South with our easy recipe for perfectly crispy and juicy Nashville Hot Chicken Tenders. Marinated in buttermilk and coated in a signature blend of seasonings, these tenders deliver the authentic taste of Nashville in every bite.
Ingredients
– 1 lb chicken tenders
– 1 cup buttermilk
– 1 cup all-purpose flour
– 1 tsp paprika
– 1 tsp garlic powder
– 1 tsp onion powder
– 1 tsp cayenne pepper
– 1 tsp salt
– 1/2 tsp black pepper
– Vegetable oil for frying
– 2 tbsp hot sauce
– 1 tbsp brown sugar
Instructions
1. 1. Place the chicken tenders in a shallow dish and pour the buttermilk over them. Cover and refrigerate for at least 30 minutes, up to 2 hours.
2. 2. In a shallow bowl, whisk together the flour, paprika, garlic powder, onion powder, cayenne, salt, and black pepper.
3. 3. Remove the tenders from the buttermilk, one at a time, and dredge them in the seasoned flour, pressing to adhere.
4. 4. In a large skillet, heat 1/2 inch of vegetable oil over medium-high heat. Fry the coated tenders in batches for 3-4 minutes per side, until golden brown and cooked through.
5. 5. In a small bowl, whisk together the hot sauce and brown sugar. Toss the fried tenders in the spicy sauce to coat.
6. 6. Serve the Nashville Hot Chicken Tenders immediately, garnished with dill pickles and fresh parsley if desired. Enjoy!
Notes
For an extra crispy texture, let the coated tenders rest on a wire rack for 10 minutes before frying. Adjust the amount of cayenne pepper to your desired level of heat. The tenders can be kept warm in a 200°F oven until ready to serve.
- Prep Time: 15
- Cook Time: 20
- Category: Main Course
- Method: Frying
- Cuisine: American, Southern
Conclusion
There’s no doubt about it – these Nashville Hot Chicken Tenders are the ultimate comfort food. With their perfectly crispy exterior, juicy interior, and that signature fiery seasoning, they’re sure to become a new family favorite.
So what are you waiting for? Gather up the ingredients, fire up that oil, and get ready to experience the true taste of Music City right in your own kitchen. Trust me, one bite and you’ll be hooked, just like I was all those years ago. Enjoy!