
Growing up in New Orleans, I have so many fond memories of the iconic Mini Muffuletta Sandwiches. It was a weekend tradition to visit the local Italian market and pick up a fresh, crusty muffuletta loaf to share with my family. There was nothing quite like slicing into that soft, pillowy bread and layering on the tangy olive salad, cured meats, and melty cheese. The flavors just exploded in your mouth, transporting you right to the heart of the French Quarter.
Even now, the aroma of those Mini Muffuletta Sandwiches takes me back to those carefree afternoons spent gathered around the kitchen table, laughing and swapping stories over a hearty meal. It’s a flavor that’s truly embedded in my DNA, and one that I’m thrilled to be able to share with you today.
Why This Mini Muffuletta Sandwiches Recipe Will Become Your Go-To
What makes this Mini Muffuletta Sandwiches recipe so special is the perfect balance of flavors and textures. The savory, briny olive salad pairs beautifully with the richness of the cured meats and creamy provolone cheese. And the soft, pillowy bread acts as the perfect vessel to hold it all together. But the real secret lies in the way the sandwiches are assembled and baked, resulting in a warm, melty, and utterly irresistible Mini Muffuletta that you’ll crave time and time again.
The Secret Behind Perfect Mini Muffuletta Sandwiches
By slicing the bread in half horizontally and layering the fillings, you end up with a neat, compact sandwich that’s easy to eat and share. And the trick of brushing the exterior with a garlic-infused oil before baking gives the bread a crisp, golden-brown crust that’s absolutely divine. Trust me, once you try these Mini Muffuletta Sandwiches, you’ll be hooked!
Essential Ingredients You’ll Need
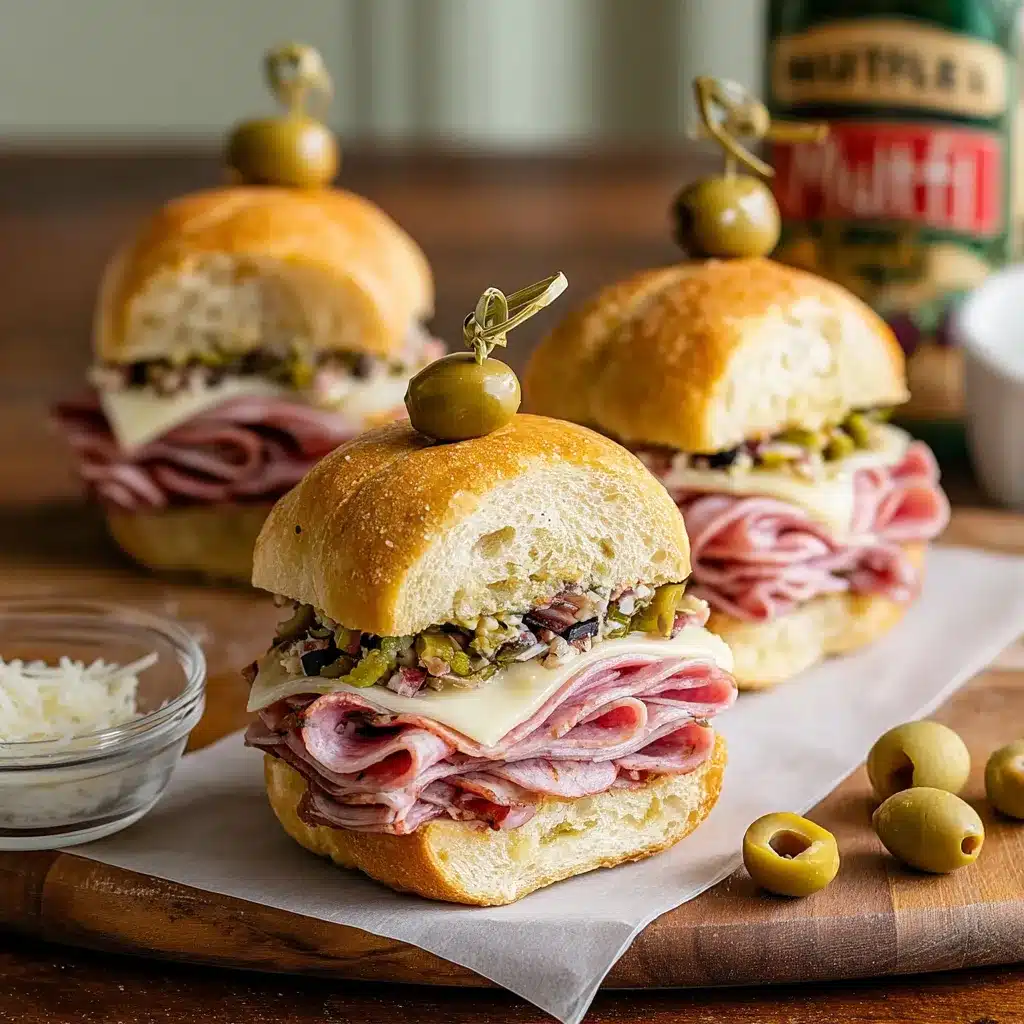
- Muffuletta bread or soft, round sandwich rolls
- Olive salad (a classic New Orleans condiment made with olives, celery, carrots, and a tangy vinaigrette)
- Thinly sliced salami, ham, and mortadella
- Sliced provolone cheese
- Garlic-infused olive oil for brushing
Step-by-Step Mini Muffuletta Sandwiches Instructions
Preparing Your Mini Muffuletta Sandwiches
These Mini Muffuletta Sandwiches are a breeze to put together and can be served as an appetizer, a main course, or even a hearty snack. With just a handful of ingredients and a quick assembly process, you’ll have these delectable sandwiches ready to enjoy in no time.
1- Start by slicing your muffuletta bread or sandwich rolls in half horizontally to create a top and bottom.
2- Generously layer the olive salad onto the bottom half of the bread, making sure to distribute it evenly.
3- Top the olive salad with the thinly sliced cured meats, overlapping the pieces slightly.
4- Finally, arrange the slices of provolone cheese on top of the meats, covering the entire surface.
5- Replace the top half of the bread, then brush the entire exterior of the sandwich with the garlic-infused olive oil.
6- Bake the Mini Muffuletta Sandwiches in a preheated oven until the cheese is melted and the bread is golden brown, about 15-20 minutes.
Pro Tips for Success
The key to perfect Mini Muffuletta Sandwiches is to use high-quality ingredients and to assemble the sandwiches with care. Make sure to slice the bread and meats thinly, and don’t be afraid to pile on the olive salad – the more the better! Additionally, be sure to brush the exterior of the sandwiches with the garlic-infused oil before baking, as this will give them a delicious, crispy crust.
Serving and Storing Your Mini Muffuletta Sandwiches
Perfect Pairings for Mini Muffuletta Sandwiches
These Mini Muffuletta Sandwiches are incredibly versatile and pair well with a variety of sides and drinks. For a classic New Orleans-inspired spread, serve them alongside a fresh garden salad, some crispy pickle chips, and an ice-cold beer or a tall glass of iced tea. They also make a fantastic appetizer or finger food for parties and gatherings, complemented by a selection of olives, marinated vegetables, and a chilled white wine.
Storage and Make-Ahead Tips
Mini Muffuletta Sandwiches are perfect for meal prep and can be made ahead of time. Once assembled, simply wrap the sandwiches tightly in foil or plastic wrap and refrigerate for up to 3 days. When ready to serve, remove the wrapping and bake the sandwiches in a preheated oven until heated through and the cheese is melted, about 10-15 minutes.
Variations and Dietary Adaptations for Mini Muffuletta Sandwiches
Creative Mini Muffuletta Sandwiches Variations
While the classic version is hard to beat, there are plenty of ways to put your own spin on Mini Muffuletta Sandwiches. Try swapping out the cured meats for roasted turkey or grilled chicken for a lighter take. You could also experiment with different cheeses, like pepper jack or provolone. And for a seasonal twist, try adding sliced tomatoes, crisp lettuce, or fresh herbs to the filling.
Making Mini Muffuletta Sandwiches Diet-Friendly
For a gluten-free version, simply use your favorite gluten-free sandwich rolls or bread. To make them vegan, omit the cured meats and cheese, and instead use plant-based deli slices and a dairy-free cheese alternative. And for a low-carb option, serve the fillings on top of a bed of mixed greens or stuff them into hollowed-out zucchini halves.
Frequently Asked Questions
Q: Can I use a different type of bread besides muffuletta?
A: Absolutely! While traditional muffuletta bread is ideal, you can use any soft, round sandwich rolls or even a crusty baguette. Just be sure to adjust the baking time as needed.
Q: How long do the Mini Muffuletta Sandwiches keep?
A: Stored properly in the fridge, these sandwiches will stay fresh for up to 3 days. Just be sure to wrap them tightly in foil or plastic wrap to prevent the bread from drying out.
Q: Can I make the Mini Muffuletta Sandwiches ahead of time?
A: Yes, these sandwiches are perfect for meal prep! Assemble them up to 3 days in advance, then just bake them off when you’re ready to serve.
Q: How do I reheat leftover Mini Muffuletta Sandwiches?
A: For best results, reheat the sandwiches in a 350°F oven for 10-15 minutes, or until the cheese is melted and the bread is crisp. You can also microwave them for 30-60 seconds, but the bread may not get as crispy.
Q: Can I freeze Mini Muffuletta Sandwiches?
A: While you can freeze these sandwiches, the bread may become a bit soggy when thawed. For best quality, I recommend enjoying them fresh or refrigerating them for up to 3 days.

Mini Muffuletta Sandwiches
- Total Time: 15
- Yield: 24 mini sandwiches
Description
Enjoy these bite-sized, flavor-packed Mini Muffuletta Sandwiches – a delightful twist on the classic New Orleans sandwich. Perfect for snacking or serving as an appetizer, these mini sandwiches are loaded with Italian meats, cheeses, and a zesty olive salad.
Ingredients
– 1 loaf of Italian or French bread, cut into 1-inch slices
– 8 oz salami, thinly sliced
– 8 oz capicola, thinly sliced
– 8 oz provolone cheese, thinly sliced
– 8 oz mozzarella cheese, thinly sliced
– 1 cup olive salad (recipe below)
Instructions
1. – Make the olive salad: In a medium bowl, combine pitted and chopped green olives, pitted and chopped black olives, diced celery, minced garlic, olive oil, red wine vinegar, dried oregano, and a pinch of salt and pepper. Stir to combine.
2. – Assemble the sandwiches: On each slice of bread, layer the salami, capicola, provolone, and mozzarella cheese. Top with a generous spoonful of the olive salad.
3. – Cut each sandwich in half diagonally to create mini muffuletta sandwiches.
4. – Serve immediately or refrigerate until ready to serve.
Notes
These mini muffuletta sandwiches can be made ahead of time and refrigerated until ready to serve. The olive salad can also be prepared in advance and stored in the fridge for up to a week.
- Prep Time: 15
- Category: Snacks & Desserts
- Method: Assembly
- Cuisine: New Orleans, Italian
Conclusion
There’s nothing quite like the bold, flavor-packed experience of biting into a warm, melty Mini Muffuletta Sandwich. Whether you’re transporting yourself back to the vibrant streets of New Orleans or discovering this iconic dish for the first time, I’m confident that this recipe will become a new favorite in your household. So what are you waiting for? Gather your ingredients, fire up your oven, and get ready to enjoy a taste of the Big Easy right in your own kitchen!