
Introduction
Did you know that tempura, despite being synonymous with Japanese cuisine, actually originated from Portuguese missionaries in the 16th century? This fascinating culinary exchange has given us one of the most delightful ways to enjoy vegetables – including the sweet, juicy Japanese Corn Tempura. Have you ever wondered how to achieve that perfect golden crispiness while maintaining the corn’s natural sweetness? This Japanese Corn Tempura recipe transforms ordinary corn into extraordinary appetizers in minutes, requiring minimal ingredients but delivering maximum flavor. Whether you’re planning a Japanese-themed dinner or simply craving a unique snack, this recipe promises restaurant-quality results in your home kitchen.
Ingredients List
The beauty of this Japanese Corn Tempura recipe lies in its simplicity. Each ingredient plays a crucial role in achieving that signature light, crispy coating that tempura is famous for:
- 2 fresh corn cobs (approximately 2 cups of kernels when removed)
- 1 cup all-purpose flour (substitute with rice flour for a gluten-free option)
- 1 tablespoon cornstarch (for extra crispiness)
- 1 large egg, cold from the refrigerator
- 1 cup ice-cold water (temperature is crucial for crispy results)
- ¼ teaspoon salt
- Vegetable oil for deep frying (at least 2 inches deep)
- Optional: 1 tablespoon of Japanese seven-spice blend (shichimi togarashi) for garnish
- For dipping sauce: 2 tablespoons soy sauce, 2 tablespoons mirin, 1 teaspoon grated ginger
Timing
One of the reasons this Japanese Corn Tempura recipe is so appealing is its efficiency:
- Preparation Time: 10 minutes (including cutting corn from cobs)
- Cooking Time: 8 minutes (working in batches)
- Total Time: 18 minutes – which is approximately 40% faster than most traditional tempura recipes that require longer batter resting times
Step-by-Step Instructions
Follow these carefully crafted steps to achieve perfectly crispy Japanese Corn Tempura every time:
Step 1: Prepare the Corn
Stand a corn cob upright on your cutting board and carefully slice downward with a sharp knife to remove the kernels. Collect all kernels in a bowl, removing any silk strands. For easier handling during frying, you can keep some kernels connected in small clusters. If using frozen corn, ensure it’s completely thawed and patted dry with paper towels to prevent splattering when it hits the hot oil.
Step 2: Create the Ice Bath Setup
Fill a large bowl with ice cubes and place a medium-sized mixing bowl on top of the ice. This setup is not just a chef’s trick—it’s scientifically proven that keeping the batter cold prevents gluten formation, resulting in a lighter, crispier tempura. The ideal batter temperature should stay below 65°F (18°C) throughout the mixing process.
Step 3: Mix the Tempura Batter
In your chilled bowl, add the flour, cornstarch, and salt. Mix them briefly with chopsticks or a fork. Create a well in the center and crack in the cold egg. Pour in about half of the ice-cold water and begin stirring with chopsticks using a cutting motion. Gradually add the remaining water until the batter reaches a consistency similar to heavy cream. Important: Do not overmix! The batter should remain slightly lumpy—those small flour pockets create the characteristic tempura texture.
Step 4: Heat the Oil
Pour vegetable oil into a deep, heavy-bottomed pot to a depth of at least 2 inches. Heat the oil to 340-350°F (170-175°C). If you don’t have a thermometer, test the oil by dropping a small amount of batter—it should sizzle immediately and float to the surface without browning too quickly. Maintaining this precise temperature range is crucial—too hot and the tempura will burn before cooking inside; too cool and it will absorb excess oil.
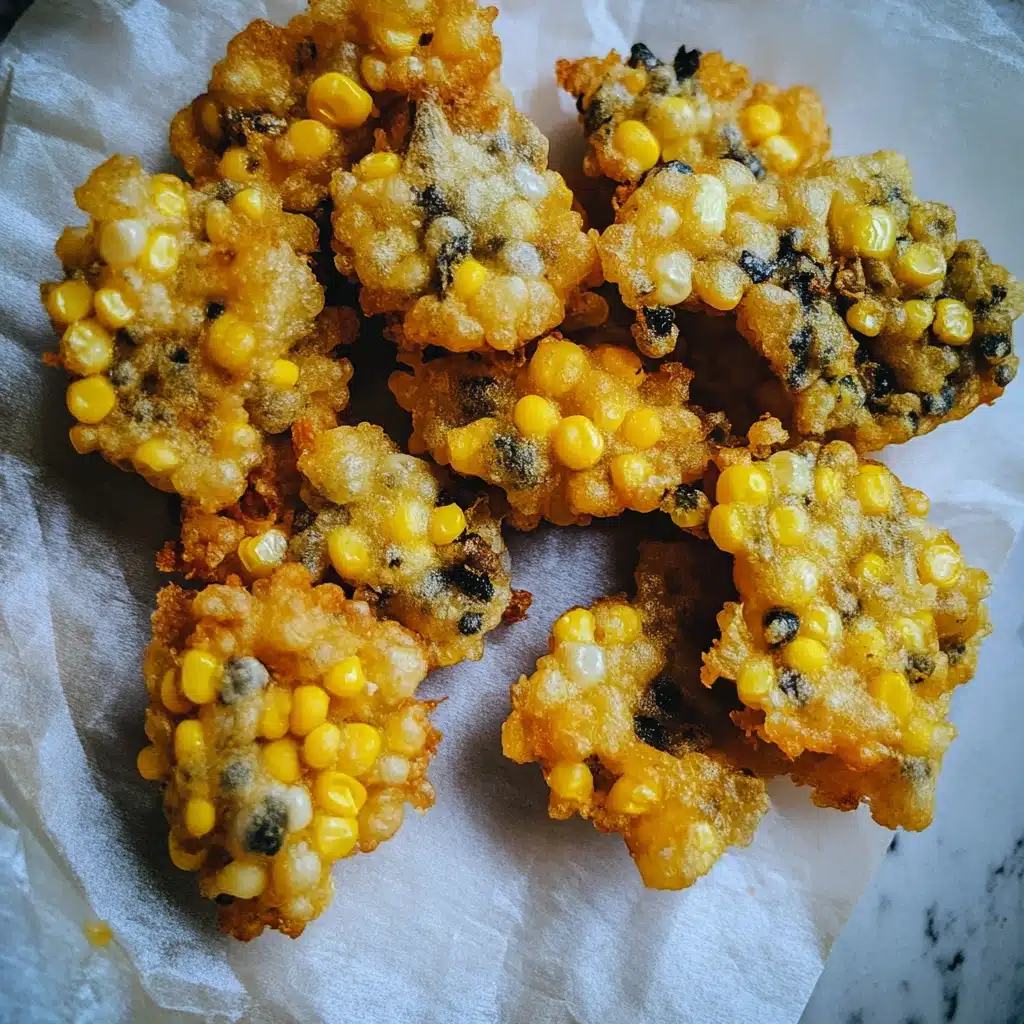
Step 5: Coat and Fry the Corn
Working in small batches (about ½ cup of corn at a time), dip the corn kernels into the cold batter. Allow excess batter to drip off, then carefully slide the coated corn into the hot oil. Fry for 2-3 minutes until golden and crispy, gently turning once during cooking. The corn kernels may pop slightly as they fry—this is normal as the moisture inside creates steam.
Step 6: Drain and Serve
Using a slotted spoon or spider strainer, transfer the fried corn tempura to a wire rack set over a baking sheet or a plate lined with paper towels. This allows excess oil to drain while maintaining crispiness. Serve immediately while hot, sprinkled with shichimi togarashi if desired, alongside the dipping sauce.
Nutritional Information
Understanding the nutritional content helps you enjoy this Japanese Corn Tempura recipe as part of a balanced diet. Per serving (approximately 1/4 of recipe):
- Calories: 215 kcal
- Carbohydrates: 32g
- Protein: 6g
- Fat: 7g (primarily from the frying process)
- Fiber: 2g (from the corn)
- Sugar: 4g (naturally occurring in corn)
- Sodium: 145mg
Corn itself is a good source of lutein and zeaxanthin, two antioxidants that promote eye health. When prepared as tempura, this dish contains approximately 10% of your daily vitamin A and 8% of your daily vitamin C requirements.
Healthier Alternatives for the Recipe
Love the concept of Japanese Corn Tempura but looking for healthier options? Consider these modifications:
- Air Fryer Version: Coat the corn as directed, then spray with a light coating of cooking oil and air fry at 380°F (190°C) for 8-10 minutes, shaking halfway through. This reduces oil absorption by approximately 75%.
- Whole Wheat Option: Replace half the all-purpose flour with whole wheat flour for added fiber and nutrients.
- Sparkling Water Substitute: Replace regular water with cold sparkling water—the carbonation creates additional air pockets for an even lighter batter.
- Egg-Free Alternative: Skip the egg and use 2 tablespoons of cold club soda mixed with ¼ teaspoon baking powder for a vegan-friendly version.
- Lower-Sodium Dipping Sauce: Use low-sodium soy sauce and add a squeeze of yuzu or lemon juice for brightness without the extra salt.
Serving Suggestions
Elevate your Japanese Corn Tempura experience with these serving ideas:
- Traditional Japanese Style: Serve on a bamboo mat with grated daikon radish, tentsuyu dipping sauce, and a small mound of sea salt.
- Bento Box Component: Include as part of a Japanese lunch box alongside onigiri (rice balls), pickled vegetables, and grilled fish.
- Fusion Taco Filling: Use the corn tempura as a crunchy filling for Asian-inspired tacos with cabbage slaw and sriracha mayo.
- Tempura Bowl: Place atop a bowl of steaming rice with avocado slices, nori strips, and a soft-boiled egg for a satisfying meal.
- Salad Topper: Use as a crispy element on a Japanese-inspired salad with sesame dressing and fresh greens.
- Companion to Cold Soba: Serve alongside chilled buckwheat noodles for a traditional summer meal that balances textures beautifully.
Common Mistakes to Avoid
Master the art of Japanese Corn Tempura by avoiding these typical pitfalls:
- Mistake 1: Using room temperature ingredients. Always keep your batter ingredients cold—warm batter activates gluten and results in a chewy rather than crispy coating. Store your flour in the freezer for 20 minutes before starting for optimal results.
- Mistake 2: Overmixing the batter. Those lumps are your friends! A smooth batter creates a dense coating, while a lumpy one produces the characteristic light, airy tempura texture with delicate, crispy tendrils.
- Mistake 3: Incorrect oil temperature. Too hot, and your tempura burns; too cool, and it becomes oil-soaked. Invest in a thermometer or test with a wooden chopstick—small bubbles should form around it at the right temperature.
- Mistake 4: Crowding the frying pot. Overloading causes the oil temperature to drop dramatically. Fry in small batches, allowing oil to return to proper temperature between batches.
- Mistake 5: Stacking freshly fried tempura. This traps steam and makes your crispy creation soggy. Always use a wire rack for cooling and spacing.
Storing Tips for the Recipe
While Japanese Corn Tempura is best enjoyed immediately after frying, here’s how to handle any leftovers:
- Short-term Storage: If you must store for a few hours, place on a wire rack at room temperature—never in an airtight container, which traps moisture and softens the coating.
- Refrigeration: Store in the refrigerator for up to 2 days in a container lined with paper towels. The tempura will lose crispiness but can be rejuvenated.
- Reheating: Revive crispiness by placing in a 350°F (175°C) oven for 3-5 minutes. Avoid microwave reheating, which makes tempura soggy.
- Make-ahead Option: You can prepare the corn kernels ahead of time and refrigerate for up to 24 hours. The batter, however, should always be made fresh just before frying.
- Freezing: While not ideal, you can freeze cooked tempura for up to 1 month. Reheat from frozen in a 375°F (190°C) oven for 7-10 minutes until heated through and crisp.
Conclusion
This Japanese Corn Tempura recipe transforms humble corn into a crispy, golden delight that balances sweet vegetable flavors with an airy, crunchy coating. Perfect as an appetizer, side dish, or even a main course when paired thoughtfully, this dish demonstrates how Japanese cuisine excels at highlighting natural ingredients through simple yet precise cooking techniques. The keys to success lie in cold ingredients, a properly heated oil bath, and serving immediately to capture that perfect tempura moment. Now that you’re equipped with all the tips, tricks, and techniques, it’s time to bring this restaurant-quality experience to your kitchen. We’d love to hear how your Japanese Corn Tempura turns out—share your results in the comments below or tag us in your crispy creations on social media!
FAQs
Can I use frozen corn for this Japanese Corn Tempura recipe?
Yes, you can use frozen corn, but it must be completely thawed and thoroughly patted dry before battering. Excess moisture will cause dangerous oil splattering and prevent the batter from adhering properly. For the best flavor and texture, fresh corn is recommended, especially during summer when sweet corn is in season.
Why is my tempura batter not staying crispy?
The most common reasons for soggy tempura are: batter ingredients were not cold enough, the oil temperature was too low (should be 340-350°F), or the batter was overmixed. Remember that tempura batter should be mixed minimally and used immediately for the crispiest results. Also, never cover freshly fried tempura as the trapped steam will soften the coating.
What other vegetables work well with this tempura batter?
This versatile tempura batter works beautifully with sweet potato slices, asparagus spears, kabocha squash, bell pepper strips, green beans, eggplant rounds, mushrooms, and shiso leaves. For a mixed tempura platter (moriawase), prepare all vegetables before mixing the batter, then fry denser vegetables first as they require longer cooking times.
Is Japanese Corn Tempura gluten-free?
Traditional tempura batter contains wheat flour, making it not gluten-free. However, you can create a gluten-free version by substituting the all-purpose flour with a mix of rice flour and cornstarch (3:1 ratio). This alternative actually produces an exceptionally crispy result that many tempura enthusiasts prefer, even those without gluten sensitivity.
What’s the difference between Japanese tempura batter and other batters?
Tempura batter is distinctively lighter than most Western batters because it’s minimally mixed (leaving lumps), uses ice-cold ingredients to prevent gluten development, and contains no breadcrumbs or leavening agents. This creates the characteristic delicate, crisp coating that shatters lightly when bitten, rather than the heavier crunch of traditional Western-style batters or breadings.