
Icebox cakes were a staple in my grandma’s kitchen growing up. Every summer, when the heat would start to creep in, she’d whip up her famous icebox cake recipe and we’d all gather around the table to enjoy its cool, creamy deliciousness. There was something so magical about that first bite – the way the crisp, chocolatey wafers would melt on your tongue, followed by the light and airy whipped cream. It was pure bliss.
I can still remember the anticipation as we’d watch her assemble the layers, carefully placing each wafer just so and smoothing the whipped cream over the top. And the waiting – oh, the waiting! She’d always make us wait at least a few hours, sometimes even overnight, before we could dive in. But let me tell you, that patience was always rewarded. When we finally got to cut into that icebox cake, it was absolute perfection.
Now, as an adult, I find myself craving that nostalgic flavor more and more. That’s why I’ve perfected my own icebox cake recipe, one that captures all the magic of my grandma’s version but with a few modern twists. Trust me, this is going to become your new go-to summertime dessert.
Why This Icebox Cake Recipe Will Become Your Go-To
What sets this icebox cake recipe apart is the perfect balance of flavors and textures. The crisp, chocolatey wafers provide a delightful contrast to the light and airy whipped cream, while the touch of vanilla and a hint of sweetness create a truly irresistible combination. And the best part? It’s so easy to make, with minimal effort required.
The Secret Behind Perfect icebox cake recipe
The secret to this recipe lies in the whipped cream. Rather than using a store-bought variety, I insist on making my own. It takes just a few minutes, but the difference in flavor and texture is truly remarkable. The homemade whipped cream is silkier, richer, and more decadent than anything you’ll find in a tub. And by adding a touch of vanilla extract, it takes the overall flavor profile to new heights.
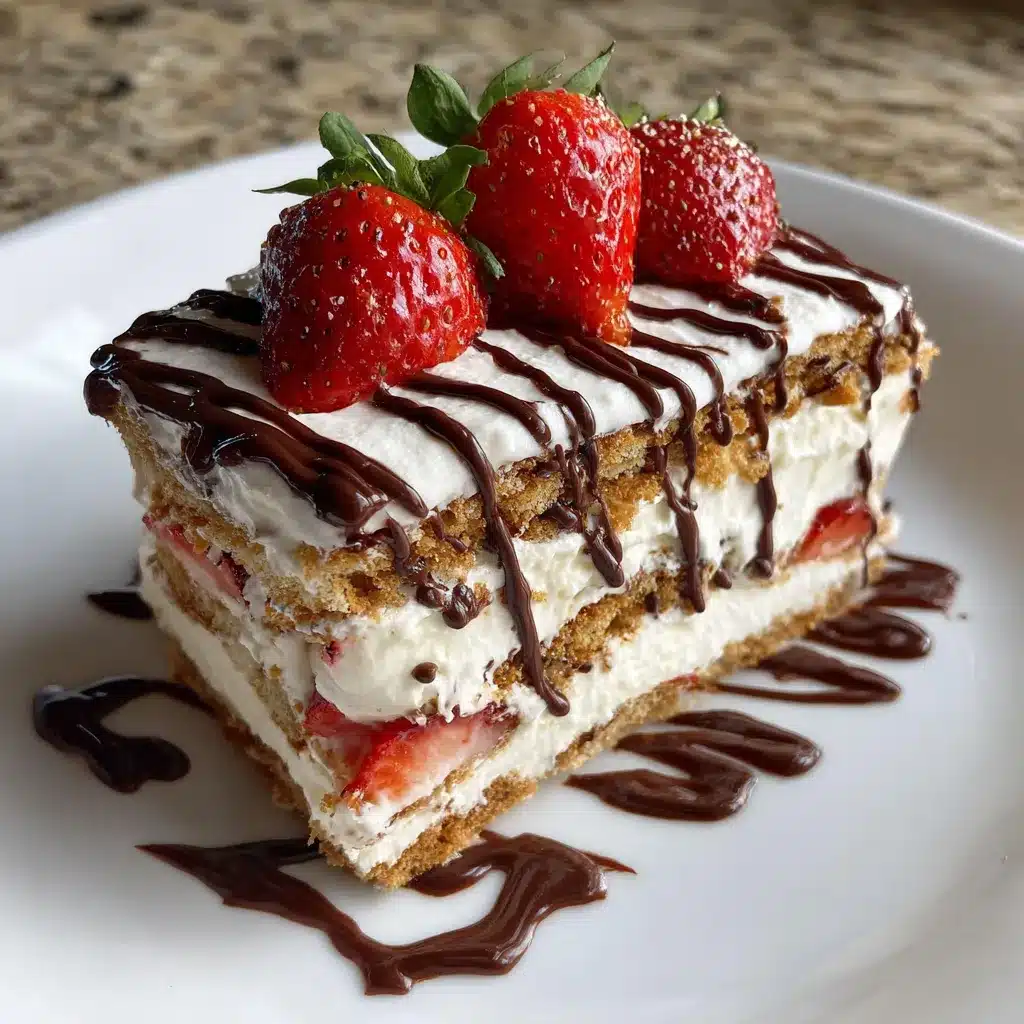
Another key to success is the layering technique. By carefully arranging the wafers and smoothing the whipped cream between each layer, you create a beautifully structured dessert that’s not only visually stunning but also ensures that every bite is equally delicious.
Essential Ingredients You’ll Need
– Chocolate wafer cookies: These are the foundation of the icebox cake, providing the perfect crisp and chocolatey base.
– Heavy whipping cream: The star of the show, the whipped cream is what makes this dessert so light and creamy.
– Granulated sugar: Just a touch of sweetness to balance out the richness of the cream.
– Vanilla extract: A must-have for that classic, comforting flavor.
– Cocoa powder (optional): For a little extra chocolatey goodness, you can dust the top of the cake with a light coating of cocoa powder.
Step-by-Step icebox cake recipe Instructions
Preparing your icebox cake recipe is a breeze, and the end result is well worth the minimal effort. The total time from start to finish is just about 30 minutes, plus a few hours (or even overnight) of chilling in the fridge to allow the flavors to meld and the wafers to soften.
1- Begin by whipping the heavy cream in a large mixing bowl using a hand mixer or stand mixer fitted with the whisk attachment. Start on low speed and gradually increase to high, whipping until soft peaks form.
2- Gradually add the granulated sugar and vanilla extract, continuing to whip until the cream holds stiff peaks. Be careful not to overwhip, as the cream can quickly turn to butter.
3- Arrange a single layer of chocolate wafer cookies in the bottom of a 9×13 inch baking dish or a round springform pan. Spread a generous layer of the whipped cream over the top, ensuring that the edges are fully covered.
4- Repeat the layering process, alternating between wafers and whipped cream, until you’ve used up all the ingredients. The top layer should be a smooth, even coating of whipped cream.
5- For a finishing touch, you can lightly dust the top of the icebox cake with unsweetened cocoa powder, if desired.
6- Cover the dish with plastic wrap or foil and refrigerate for at least 4 hours, or up to 24 hours. This allows the wafers to soften and the flavors to meld, creating the perfect icebox cake.
Pro Tips for Success
One of the keys to making a truly exceptional icebox cake is to avoid over-whipping the cream. Keep a close eye on it and stop as soon as it reaches the stiff peak stage. Overwhipped cream can become grainy and lose its light, airy texture.
Another tip is to be mindful of the arrangement of the wafers. Carefully place them in a single, even layer, making sure there are no gaps or overlaps. This will ensure a clean, professional-looking finish to your cake.
It’s also worth noting that the longer you can chill the icebox cake, the better. While 4 hours is the minimum, letting it sit overnight or for up to 24 hours will result in the perfect soft, cake-like texture.
Serving and Storing Your icebox cake recipe
Perfect Pairings for icebox cake recipe
This icebox cake recipe is a true crowd-pleaser, making it the perfect dessert for any summer gathering or special occasion. It pairs beautifully with a refreshing cup of coffee or a scoop of your favorite vanilla ice cream. For a sophisticated twist, you could even serve it alongside a glass of chilled white wine or a sophisticated cocktail.
Storage and Make-Ahead Tips
One of the best things about this icebox cake recipe is that it can be made in advance, making it the ultimate stress-free dessert. Simply assemble the cake, cover it, and refrigerate for up to 24 hours before serving. The longer it chills, the better the wafers will soften and the flavors will meld.
If you have any leftovers (which is unlikely!), the icebox cake can be stored in the refrigerator for up to 5 days. Just be sure to keep it covered to prevent the whipped cream from drying out.
Variations and Dietary Adaptations for icebox cake recipe
Creative icebox cake recipe Variations
While this classic chocolate wafer icebox cake is a true delight, there are so many ways to put your own spin on it. For a festive touch, you could try using gingerbread or graham cracker wafers instead of the chocolate variety. Or, for a fruity twist, layer in fresh berries or a tangy lemon curd between the whipped cream.
Another fun variation is to experiment with different flavor profiles in the whipped cream. A hint of orange zest or a dash of cinnamon can add a delightful depth of flavor. You could even try swirling in a bit of melted chocolate or caramel for an extra indulgent treat.
Making icebox cake recipe Diet-Friendly
For those following a gluten-free or dairy-free diet, this icebox cake recipe can be easily adapted to suit your needs. Simply swap out the chocolate wafer cookies for gluten-free graham crackers or dairy-free chocolate wafers. And instead of using heavy whipping cream, you can substitute a high-quality non-dairy whipped topping, such as coconut-based or cashew-based varieties.
These substitutions will ensure that everyone can enjoy the delicious flavors of this classic summertime dessert, no matter their dietary restrictions.
Frequently Asked Questions
Q: Can I use store-bought whipped cream instead of making my own?
A: While you certainly can use store-bought whipped cream, I highly recommend taking the extra few minutes to make your own. The homemade version has a much richer, creamier texture and flavor that truly elevates the overall dish.
Q: How long does the icebox cake need to chill in the fridge?
A: For best results, the icebox cake should chill for at least 4 hours, but ideally overnight or up to 24 hours. This allows the wafers to soften and the flavors to meld together perfectly.
Q: Can I make this icebox cake in advance?
A: Absolutely! This recipe is perfect for making ahead of time. You can assemble the entire cake, cover it, and refrigerate for up to 24 hours before serving.
Q: How do I know when the icebox cake is ready to serve?
A: The best way to tell is to gently press on the top of the cake. It should feel firm and stable, with the wafers softened to a cake-like texture. You can also use a knife to gently test one of the edges to ensure the wafers have fully softened.
Q: What if my whipped cream doesn’t hold its shape?
A: If your whipped cream is a bit too soft, try popping the entire assembled icebox cake in the freezer for 30 minutes to an hour. This will help the cream firm up and hold its shape better when slicing and serving.
Conclusion
This icebox cake recipe is a true summertime delight, and I can’t wait for you to try it. With its perfect balance of crisp wafers and light, creamy whipped cream, it’s a dessert that’s sure to impress your family and friends. Plus, the make-ahead versatility means you can enjoy this sweet treat with minimal fuss.
So, what are you waiting for? Gather your ingredients, put on your apron, and get ready to create a dessert that will have everyone raving. Don’t forget to share your experience and tag me on social media – I’d love to see your beautiful icebox cakes!