
I’ll never forget the day I had my last Butterfinger. I was just a kid, probably around 10 or 11 years old, and my mom had forbidden me from eating them anymore. Apparently, they were “too unhealthy” and full of “junk.” As if a growing boy like me didn’t need the sugar and fat boost! I tried to argue, but she wouldn’t budge. No more Butterfingers. Period.
I was devastated. Butterfingers had always been my favorite candy bar. There was just something about that perfect balance of crispy, crunchy peanut butter goodness encased in a smooth, chocolatey shell. I’d savor every single bite, making it last as long as I possibly could. But now, that simple pleasure was gone.
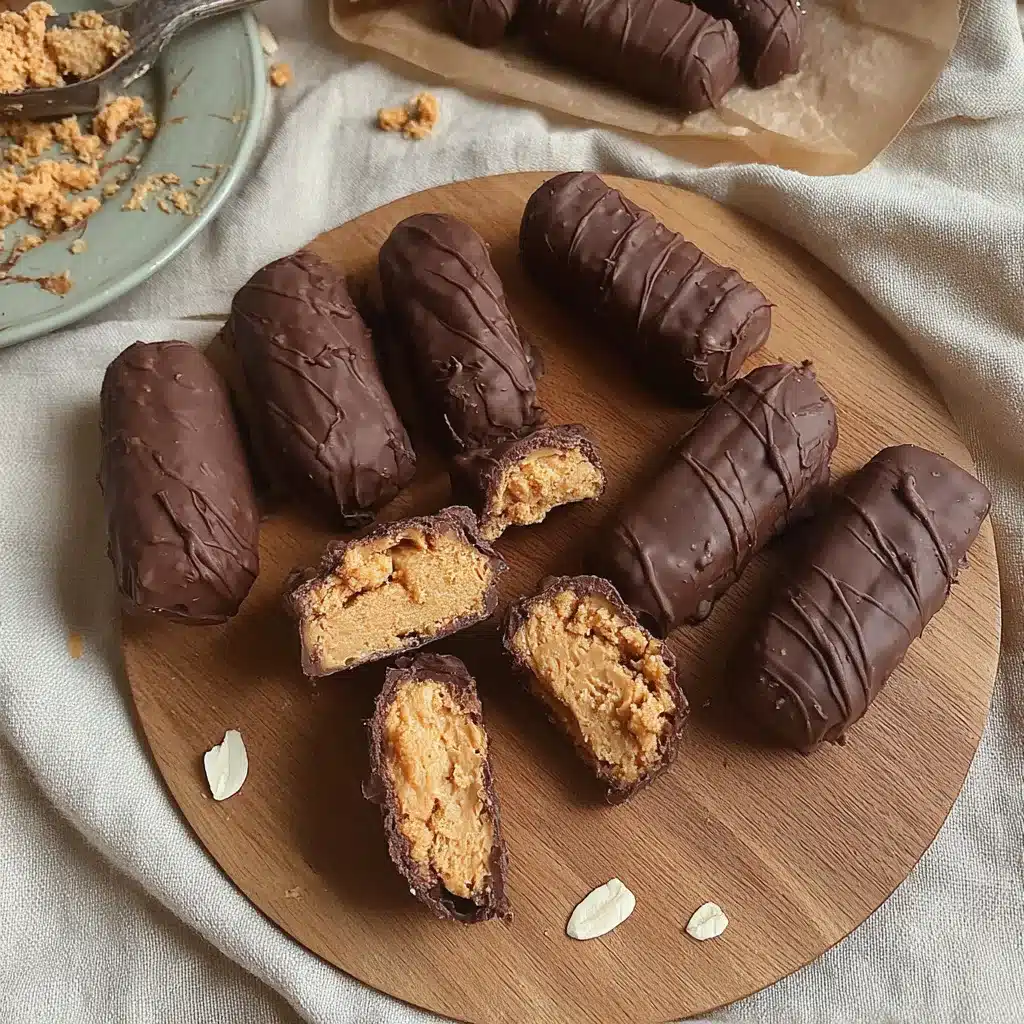
Or so I thought. Years later, as an adult, I discovered the magic of Healthy Homemade Butterfingers. Turns out, you can recreate all the flavors I loved as a kid, but in a much more wholesome way. No weird ingredients, no refined sugar, no guilt. Just pure, unadulterated Butterfinger bliss. Let me tell you, making Healthy Homemade Butterfingers has become my new favorite hobby. And creating the perfect recipe has been quite the delicious journey.
Why This Healthy Homemade Butterfingers Recipe Will Become Your Go-To
The Secret Behind Perfect Healthy Homemade Butterfingers
What makes this Healthy Homemade Butterfingers recipe truly special is the unique technique I use to get that signature crunchy, airy texture. Instead of just melting down the ingredients and pouring them into molds, I’ve developed a special method that involves whipping the mixture to incorporate air pockets. This gives the final product an irresistible light and crispy bite, just like the original Butterfinger candy bars. Trust me, once you try these, you’ll never go back to the store-bought version.
Essential Ingredients You’ll Need
- Peanut butter: The peanut butter is the star of the show here, so make sure to use a high-quality, creamy variety. I prefer an all-natural peanut butter without any added sugars or oils.
- Honey: Honey replaces the refined sugar in traditional Butterfingers, providing natural sweetness and chewiness.
- Coconut oil: Coconut oil helps bind the ingredients together and gives the Healthy Homemade Butterfingers their signature glossy sheen.
- Cocoa powder: A dusting of unsweetened cocoa powder on the outside mimics the chocolate coating of a classic Butterfinger.
- Vanilla extract: Just a touch of vanilla enhances all the other flavors.
Step-by-Step Healthy Homemade Butterfingers Instructions
Preparing Your Healthy Homemade Butterfingers
This Healthy Homemade Butterfingers recipe is surprisingly easy to make, with just a few simple steps. In total, it will take you about 30 minutes from start to finish, including the cooling time. You’ll need a mixing bowl, a whisk or hand mixer, and a baking sheet lined with parchment paper.
1- In a large bowl, combine the peanut butter, honey, coconut oil, cocoa powder, and vanilla. Use a whisk or hand mixer to beat the mixture until it’s light and fluffy, about 2-3 minutes.
2- Scoop the whipped peanut butter mixture onto the prepared baking sheet, forming it into bite-sized mounds with your hands. Make sure to leave a bit of space between each one.
3- Place the baking sheet in the freezer and let the Healthy Homemade Butterfingers chill for 15-20 minutes, until they’re firm to the touch.
4- Remove the sheet from the freezer and use a fork to gently press down on the tops of the mounds, creating the classic Butterfinger shape and ridges.
5- Return the tray to the freezer for another 10 minutes, just to set the indentations.
6- Finally, dust the tops of the Healthy Homemade Butterfingers generously with cocoa powder, making sure to coat them evenly.
Pro Tips for Success
The key to perfect Healthy Homemade Butterfingers is in the whipping step. Be sure to beat the mixture for the full 2-3 minutes to incorporate as much air as possible. This is what gives them that light, airy texture.
Another pro tip: use room temperature peanut butter for best results. Cold peanut butter straight from the fridge can be harder to whip and won’t incorporate air as easily.
Serving and Storing Your Healthy Homemade Butterfingers
Perfect Pairings for Healthy Homemade Butterfingers
These Healthy Homemade Butterfingers make a fantastic snack all on their own, but they also pair beautifully with a tall glass of cold milk or a hot cup of coffee. For a fun dessert, try serving them alongside a scoop of vanilla ice cream. And around the holidays, they’d be a delightful addition to any cookie platter.
Storage and Make-Ahead Tips
Healthy Homemade Butterfingers will keep in an airtight container in the freezer for up to 2 months. Just be sure to store them in a single layer to prevent them from sticking together. When you’re ready to enjoy, let them thaw at room temperature for 5-10 minutes before serving.
You can also make a big batch of the whipped peanut butter mixture and portion it out into individual servings on the baking sheet. Freeze the mounds, then transfer them to a freezer-safe bag or container once solid. This way, you can pull out just what you need anytime the Butterfinger craving strikes.
Variations and Dietary Adaptations for Healthy Homemade Butterfingers
Creative Healthy Homemade Butterfingers Variations
For a fun twist, try adding a sprinkle of sea salt or a drizzle of melted dark chocolate over the top of your Healthy Homemade Butterfingers. You could also experiment with different nut butters, like almond or cashew, for a new flavor profile.
Making Healthy Homemade Butterfingers Diet-Friendly
These Healthy Homemade Butterfingers are already fairly diet-friendly, with no refined sugar, gluten, or dairy. But for those with specific dietary needs, you can easily make a few simple swaps.
For a vegan version, use a plant-based peanut butter and maple syrup or agave nectar instead of honey. And if you’re watching your carbs, you can reduce the amount of honey used or substitute a low-carb sweetener like erythritol or monk fruit.
Frequently Asked Questions
Q: Can I use crunchy peanut butter instead of creamy?
A: Absolutely! Crunchy peanut butter will give your Healthy Homemade Butterfingers an even more authentic texture. Just keep in mind that the pieces of peanut may make the mixture a bit harder to whip to a light and fluffy consistency.
Q: How do I know when the Butterfingers are done chilling?
A: You’ll know the Healthy Homemade Butterfingers are ready when they’re firm to the touch and hold their shape when gently pressed. The total chilling time is about 25-30 minutes.
Q: Can I store the Butterfingers at room temperature?
A: For best quality and texture, it’s best to keep the Healthy Homemade Butterfingers stored in the freezer. The cold temperature helps maintain their crisp, airy bite. If left at room temperature, they may start to soften and lose their signature crunch.
Q: How many Butterfingers does this recipe make?
A: Depending on the size you scoop the mixture into, this recipe will yield approximately 12-15 Healthy Homemade Butterfingers.
Q: What if my Butterfingers don’t turn out as crispy as I’d like?
A: If your Healthy Homemade Butterfingers don’t have the perfect crunchy texture, try whipping the peanut butter mixture for a bit longer to incorporate more air. You can also try chilling them for an extra 5-10 minutes in the freezer.

Healthy Homemade Butterfingers
- Total Time: 145
- Yield: 12
Description
Indulge in the rich, buttery goodness of these Healthy Homemade Butterfingers, a guilt-free version of the classic candy that’s easy to make and bursting with flavor.
Ingredients
– 1 cup creamy peanut butter
– 1/2 cup honey
– 1/4 cup coconut oil
– 1 cup dark chocolate chips
Instructions
1. – In a medium saucepan, combine the peanut butter, honey, and coconut oil. Heat over low, stirring constantly, until the mixture is smooth and well combined.
2. – Remove the mixture from heat and pour it into a parchment-lined 8×8 inch baking dish. Spread it out evenly and refrigerate for at least 2 hours, or until firm.
3. – Once firm, lift the peanut butter mixture out of the baking dish and cut it into bars or squares.
4. – In a double boiler or microwave, melt the dark chocolate chips, stirring occasionally until smooth.
5. – Dip the peanut butter bars into the melted chocolate, coating them completely. Place the coated bars on a parchment-lined baking sheet and refrigerate until the chocolate is set, about 30 minutes.
Notes
For a crunchy texture, you can add crushed peanuts or graham cracker crumbs to the peanut butter mixture before chilling. You can also drizzle the coated bars with additional melted chocolate for a more decadent presentation.
- Prep Time: 15
- Cook Time: 10
- Category: Snacks & Desserts
- Method: No-Bake
- Cuisine: American
Conclusion
There’s nothing quite like biting into a Healthy Homemade Butterfinger and being transported back to the carefree days of childhood. But this version lets you enjoy all that nostalgic flavor without any of the guilt. With just a few simple ingredients and a special whipping technique, you can recreate the crispy, crunchy candy bar you loved as a kid – only this time, it’s made with wholesome, nourishing components.
So what are you waiting for? Give this Healthy Homemade Butterfingers recipe a try and prepare to be blown away. I guarantee it will become your new go-to whenever that Butterfinger craving strikes. And be sure to let me know how they turn out – I’d love to hear all about your delicious experience!