
It was a sweltering summer day when I decided to tackle the challenge of creating the perfect DIY Bento Box Lunchables for Summer. As a busy mom, I was always on the lookout for quick and healthy lunch ideas that my kids would actually enjoy. That’s when I stumbled upon the concept of DIY Bento Box Lunchables – the ultimate solution for a fun, customizable, and nutritious midday meal.
I remember the first time I assembled these mini masterpieces. My kids were captivated by the vibrant colors, the variety of textures, and the sheer excitement of being able to “build their own” lunchbox. It was a game-changer, not only for their taste buds but also for my sanity as a parent. No more struggling to get them to eat their veggies or begging them to try new foods. These DIY Bento Box Lunchables for Summer were a hit, and I knew I had to share this recipe with the world.
Why This DIY Bento Box Lunchables for Summer Recipe Will Become Your Go-To
The Secret Behind Perfect DIY Bento Box Lunchables for Summer
The key to creating the ultimate DIY Bento Box Lunchables for Summer lies in the perfect balance of flavors, textures, and convenience. This recipe not only satisfies the taste buds but also provides a nutritious and visually appealing lunchbox that will have your kids (and you!) excited for mealtime. With a combination of fresh produce, lean proteins, and wholesome snacks, these DIY Bento Box Lunchables for Summer are a game-changer in the world of packed lunches.
Essential Ingredients You’ll Need
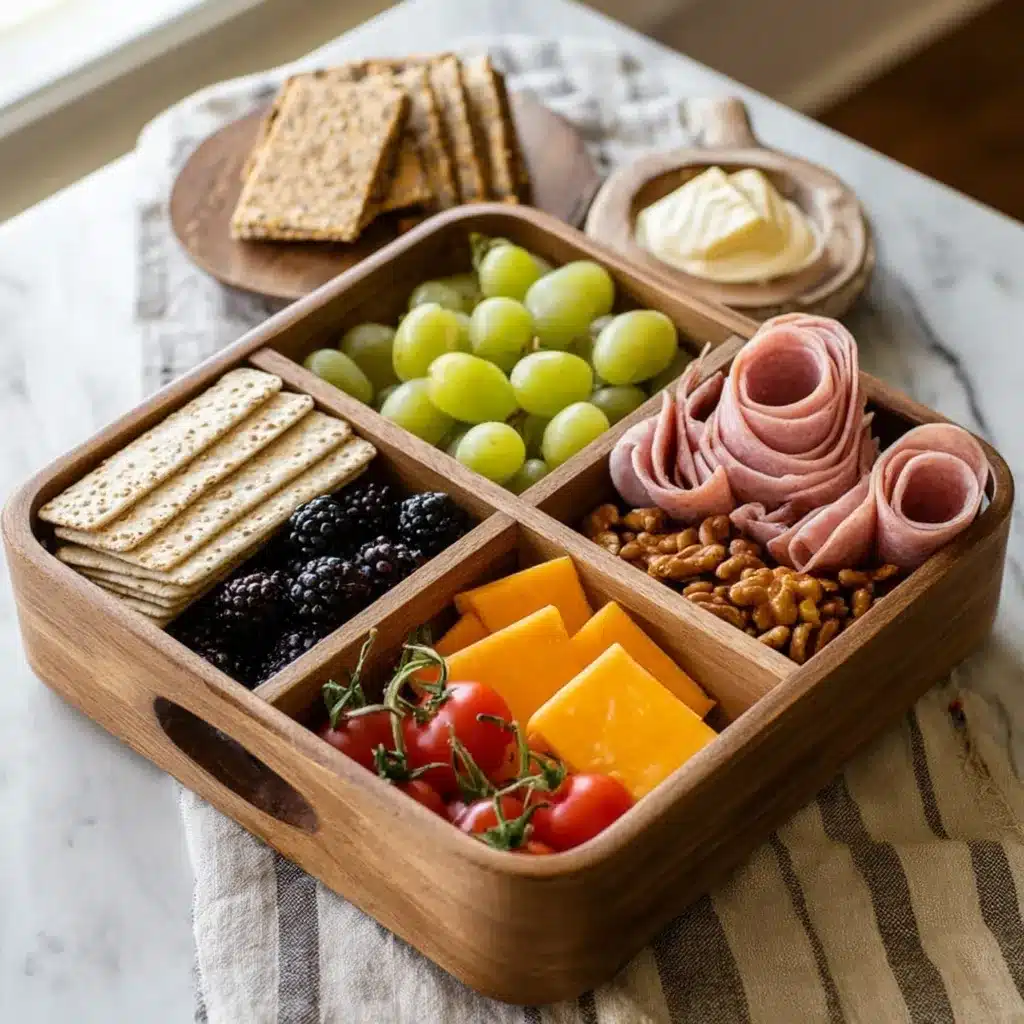
- Fresh vegetables: baby carrots, cucumber slices, cherry tomatoes, and bell pepper strips
- Lean protein: turkey or ham slices, hard-boiled eggs, and cubes of cheddar cheese
- Whole-grain crackers or pita chips
- Hummus or ranch dressing for dipping
- Fresh fruit: grapes, apple slices, or berries
- A sprinkle of sunflower seeds or roasted chickpeas for added crunch
Step-by-Step DIY Bento Box Lunchables for Summer Instructions
Preparing Your DIY Bento Box Lunchables for Summer
Creating these DIY Bento Box Lunchables for Summer is a breeze and can be done in under 20 minutes. All you need is a few simple kitchen tools, a bit of prep time, and a touch of creativity. Let’s dive in and learn how to craft these nutritious and delightful lunchbox masterpieces.
1- Start by washing and prepping your fresh produce. Slice the cucumbers, bell peppers, and carrots into bite-sized pieces. Halve the cherry tomatoes and grapes, if desired.
2- Hard-boil your eggs, cool them, and peel the shells. Cut the eggs in half or into quarters, depending on your preference.
3- Arrange the sliced meats, cheese cubes, and crackers or pita chips in the different compartments of your bento box.
4- Add the fresh vegetables, fruit, and any dipping sauces or hummus. Ensure that each section is visually appealing and balanced.
5- For a fun touch, use small cookie cutters or a knife to create fun shapes with the cheese or fruit slices.
6- Finally, close your DIY Bento Box Lunchables for Summer and pack it away in your lunch bag or cooler, ready to be enjoyed on a hot summer day.
Pro Tips for Success
- Prepare the components in advance to save time on busy mornings.
- Use a variety of colors and textures to make the lunchbox visually appealing.
- Invest in a high-quality bento box with leak-proof compartments for easy transport.
- Avoid packing items that might get soggy or wilted, such as lettuce or diced avocado.
- Encourage your kids to help assemble the DIY Bento Box Lunchables for Summer – it’ll make them more excited to eat it!
Serving and Storing Your DIY Bento Box Lunchables for Summer
Perfect Pairings for DIY Bento Box Lunchables for Summer
These DIY Bento Box Lunchables for Summer are perfectly suited for a summer picnic, a day at the beach, or a quick and healthy lunch at the office. Pair them with a refreshing lemonade or iced tea for a complete and satisfying meal. You can also serve them as an appetizer or a light snack for a backyard BBQ or summer gathering.
Storage and Make-Ahead Tips
The beauty of these DIY Bento Box Lunchables for Summer is that they can be prepared in advance, making them a perfect option for meal prepping. Simply assemble the components, place them in the bento box, and store it in the refrigerator for up to 3-4 days. When ready to serve, simply grab the lunchbox and go!
If you’re planning on making multiple servings, consider prepping the individual components in advance. Wash and slice the vegetables, hard-boil the eggs, and portion out the meats and snacks. Then, when it’s time to assemble, it’ll be a breeze.
Variations and Dietary Adaptations for DIY Bento Box Lunchables for Summer
Creative DIY Bento Box Lunchables for Summer Variations
The beauty of DIY Bento Box Lunchables for Summer is the endless possibilities for customization. Try swapping out the turkey or ham for roasted chicken, tuna salad, or even plant-based protein options like tofu or chickpeas. You can also experiment with different types of cheese, such as feta or goat cheese, for a tangy twist.
For a seasonal twist, incorporate fresh summer fruits like watermelon, peaches, or nectarines. You can also add a small portion of your kids’ favorite snacks, like granola bars or trail mix, to keep them excited about their lunchbox.
Making DIY Bento Box Lunchables for Summer Diet-Friendly
To make these DIY Bento Box Lunchables for Summer suitable for dietary restrictions, simply make a few easy substitutions. For a gluten-free version, swap the crackers for gluten-free options or use lettuce wraps instead. To make them vegan, replace the cheese and meat with plant-based alternatives, such as hummus, avocado, or roasted vegetables. For a low-carb adaptation, skip the crackers and focus on high-protein and low-carb ingredients like hard-boiled eggs, cucumber slices, and nut butter.
Frequently Asked Questions
Q: Can I prepare the DIY Bento Box Lunchables for Summer in advance?
A: Absolutely! These lunchables are perfect for meal prepping. Assemble the components in the bento box, store it in the refrigerator, and it will stay fresh for 3-4 days.
Q: How do I keep the vegetables from getting soggy?
A: To prevent sogginess, make sure to pat the vegetables dry after washing and slicing. You can also place a small paper towel in the compartment to absorb any excess moisture.
Q: Can I use different types of proteins in the DIY Bento Box Lunchables for Summer?
A: Yes, you can absolutely mix and match the proteins. Try turkey, ham, roasted chicken, tuna salad, or even plant-based options like tofu or chickpeas.
Q: What if my child doesn’t like certain ingredients?
A: The beauty of DIY Bento Box Lunchables for Summer is that you can customize them to your child’s preferences. Swap out any ingredients they don’t like for their favorite fruits, vegetables, or snacks.
Q: How can I make these DIY Bento Box Lunchables for Summer more visually appealing?
A: Get creative with shapes and colors! Use small cookie cutters or a knife to create fun shapes with the cheese, fruit, or vegetables. Arrange the components in a visually appealing way to make the lunchbox irresistible.

DIY Bento Box Lunchables for Summer
- Total Time: 5
- Yield: 1
Description
Elevate your summer lunches with these easy-to-make, customizable DIY Bento Box Lunchables! Packed with fresh, wholesome ingredients like crisp vegetables, juicy fruits, creamy cheeses, and crunchy crackers, these homemade lunchables are both delicious and nutritious.
Ingredients
– 1 cup baby carrots
– 1 cup cherry tomatoes, halved
– 1 cup sliced cucumber
– 1/2 cup cubed cheddar cheese
– 8 whole-grain crackers
– 2 tablespoons hummus or ranch dressing
Instructions
1. – Wash and prepare all the fresh produce, cutting the vegetables and cheese into bite-sized pieces.
2. – Arrange the prepared ingredients in the compartments of a bento box or divided lunch container.
3. – Include the hummus or ranch dressing in a small dipping container.
4. – Seal the bento box and refrigerate until ready to enjoy.
Notes
– Feel free to customize the ingredients to your taste preferences. Try different types of cheese, fresh fruits, nuts, or dips.
– Prepare the bento boxes in advance for easy grab-and-go lunches throughout the week.
– Store the assembled lunchables in the refrigerator for up to 3-4 days.
- Prep Time: 5
- Category: Snacks & Desserts
- Method: No Cook
- Cuisine: American
Conclusion
DIY Bento Box Lunchables for Summer are the ultimate solution for a quick, healthy, and delicious midday meal. By combining fresh produce, lean proteins, and wholesome snacks, you can create a lunchbox that your kids will be excited to dive into. Not only are these DIY Bento Box Lunchables for Summer a hit with the little ones, but they’re also a lifesaver for busy parents like myself. Give this recipe a try, and get ready to enjoy the perfect summer lunchtime experience!