
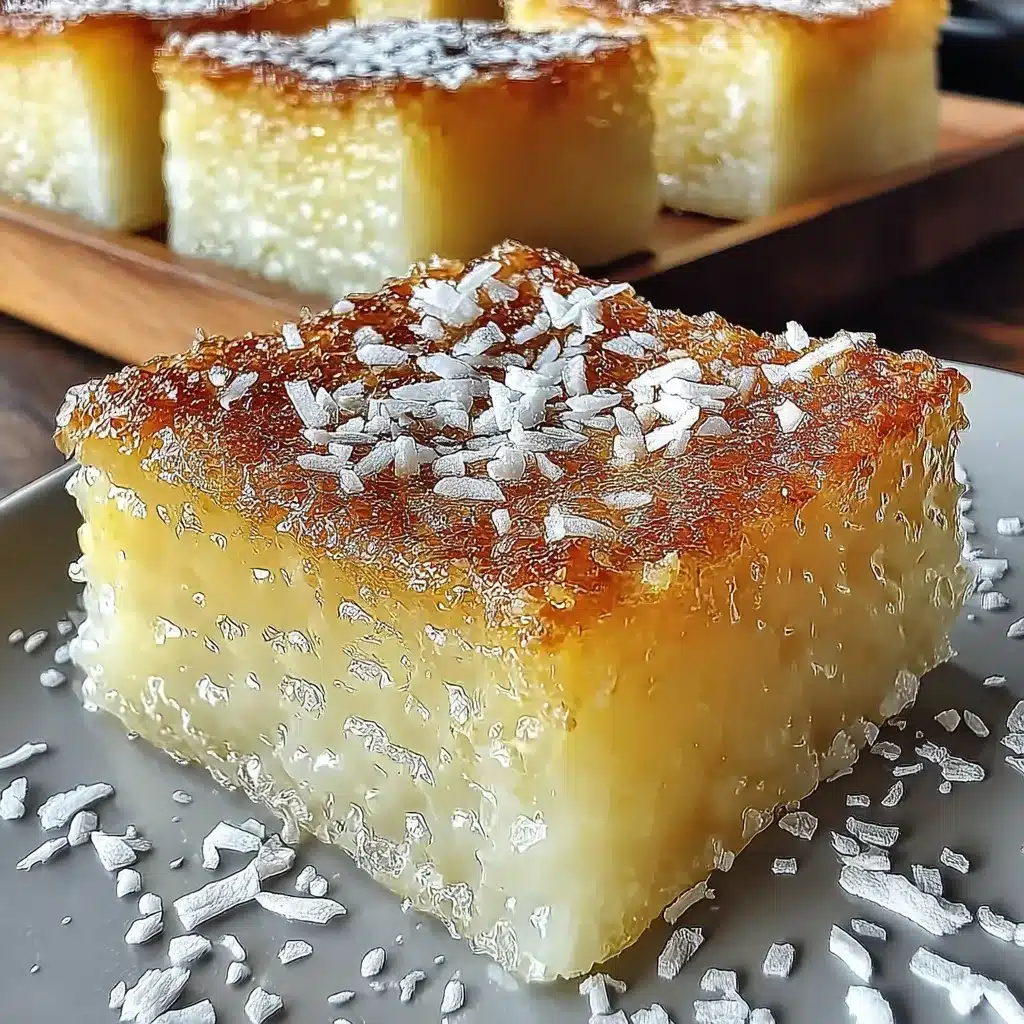
You know, the first time I ever tasted Coconut Mochi Cake, it was like a little piece of heaven on earth. I was at this small local bakery, and the owner had just pulled a fresh batch out of the oven. The aroma of sweet coconut and chewy mochi hit me as soon as I walked through the door, and I just couldn’t resist.
I remember watching the owner carefully slice into the soft, golden cake, revealing the perfectly layered interior. As soon as she handed me that first slice, I took a bite and was instantly transported. The combination of the pillowy mochi texture and the bold coconut flavor was unlike anything I’d ever tried before. It was sweet, but not overpoweringly so, and the little pockets of coconut throughout added such a lovely textural contrast.
From that moment on, Coconut Mochi Cake became one of my all-time favorite treats. I’ve since tried countless versions, from traditional recipes to fun seasonal adaptations, but nothing quite compares to that first magical bite. That’s why I’m so excited to share this truly special Coconut Mochi Cake recipe with you today. Trust me, once you try it, it’s going to become a staple in your dessert rotation.
Why This Coconut Mochi Cake Recipe Will Become Your Go-To
What makes this Coconut Mochi Cake recipe so special is the perfect balance of flavors and textures. The mochi base is chewy and tender, with a subtle sweetness that perfectly complements the bold coconut flavor. And the addition of freshly grated coconut takes the whole thing to the next level, adding a lovely crunch and an extra burst of coconut goodness in every bite.
The Secret Behind Perfect Coconut Mochi Cake
The key to achieving that perfect Coconut Mochi Cake texture is all in the technique. By steaming the mochi dough and then baking it, you end up with a cake that’s simultaneously soft and chewy, without any dryness or chewiness. And by incorporating both coconut milk and shredded coconut, you get that rich, coconutty flavor in every single layer.
Essential Ingredients You’ll Need
- Mochiko flour: This sweet rice flour is the foundation of the mochi dough, giving the cake its signature chewy texture.
- Coconut milk: Adds moisture and a deep coconut flavor to the cake.
- Granulated sugar: Sweetens the mochi and balances out the coconut.
- Shredded coconut: Freshly grated coconut provides a lovely texture and extra coconut flavor.
- Eggs: Help bind the mochi dough and give the cake a slightly cakier texture.
- Vanilla extract: Enhances the overall flavor profile.
Step-by-Step Coconut Mochi Cake Instructions
Preparing your Coconut Mochi Cake is surprisingly easy, and the end result is well worth the small amount of effort. This recipe takes just about an hour from start to finish, and the hands-on time is minimal. You’ll need a steamer basket and a square baking pan, but other than that, the ingredients and process are straightforward.
1- Start by greasing your baking pan and preheating the oven to 350°F. Then, in a large bowl, whisk together the mochiko flour, sugar, and shredded coconut until well combined.
2- In a separate bowl, beat the eggs and then stir in the coconut milk and vanilla. Pour this wet mixture into the dry ingredients and mix until you have a smooth, lump-free batter.
3- Transfer the batter to your prepared baking pan and use a spatula to spread it out evenly. Cover the pan tightly with foil and place it in your steamer basket. Steam for 30 minutes, until the mochi is set and springy to the touch.
4- Carefully remove the pan from the steamer and uncover it. The mochi should now have a lovely, slightly translucent appearance. Place the pan in the preheated oven and bake for 20-25 minutes, until the top is golden brown.
5- Let the Coconut Mochi Cake cool completely in the pan before slicing and serving. The texture will firm up as it cools, resulting in those perfect, pillowy mochi squares.
6- Once cooled, use a sharp knife to cut the Coconut Mochi Cake into squares or rectangles. Serve it as is, or dust with a little powdered sugar for an extra touch of sweetness.
Pro Tips for Success
The key to perfect Coconut Mochi Cake is all in the technique. Be sure not to overmix the batter, as that can make the mochi tough and chewy. And resist the urge to open the steamer too often, as that can affect the cake’s texture.
Another common mistake is overbaking the mochi. Keep a close eye on it in the oven, and pull it out as soon as the top is golden brown. Letting it cool completely in the pan is also essential for that signature soft, pillowy texture.
Serving and Storing Your Coconut Mochi Cake
Coconut Mochi Cake is the perfect versatile dessert. It’s delicious on its own, but also pairs beautifully with a scoop of vanilla ice cream or a dollop of freshly whipped cream. The bold coconut flavor also makes it a fantastic accompaniment to fresh tropical fruits like mango, pineapple, or kiwi.
Perfect Pairings for Coconut Mochi Cake
For a casual gathering, I love serving Coconut Mochi Cake with a big pot of fragrant jasmine tea. The delicate sweetness of the cake is the perfect foil for the slightly earthy, floral notes of the tea. And it makes for such a lovely, relaxing dessert experience.
Storage and Make-Ahead Tips
Coconut Mochi Cake actually keeps really well. You can store it in an airtight container at room temperature for up to 3 days, or in the fridge for up to a week. The texture may firm up a bit in the fridge, but you can easily soften it back up by microwaving the squares for 10-15 seconds.
You can also make the Coconut Mochi Cake in advance and freeze it for up to 2 months. Just let it thaw at room temperature before serving. And if you want to get a head start, you can even prepare the batter a day or two ahead of time and keep it covered in the fridge until you’re ready to steam and bake.
Variations and Dietary Adaptations for Coconut Mochi Cake
While the classic Coconut Mochi Cake is pretty hard to beat, there are so many fun ways to put your own spin on it. And for those with dietary restrictions, there are plenty of easy substitutions to make it work for your needs.
Creative Coconut Mochi Cake Variations
For a fun seasonal twist, you could try adding chunks of fresh pineapple or mango to the batter. Or swirl in a little melted chocolate or drizzle it on top. You could also experiment with different flavors, like matcha or ube, for a unique take on the classic.
Making Coconut Mochi Cake Diet-Friendly
To make this recipe gluten-free, you can simply substitute the regular mochiko flour with a gluten-free mochiko flour blend. For a vegan version, replace the eggs with flax or chia “eggs” and use full-fat coconut milk in place of the dairy version.
And for a lower-carb option, you can experiment with using a sugar substitute like erythritol or monk fruit in place of the granulated sugar. Just be sure to adjust the measurements accordingly.
Frequently Asked Questions
Q: Can I use regular all-purpose flour instead of mochiko flour?
A: I wouldn’t recommend substituting regular flour for the mochiko. Mochiko is essential for achieving that signature chewy mochi texture. All-purpose flour will result in a much denser, cakier texture.
Q: How do I know when the Coconut Mochi Cake is fully cooked?
A: The cake is done when the top is golden brown and springy to the touch. You can also insert a toothpick into the center – it should come out clean when the cake is fully baked.
Q: Can I make Coconut Mochi Cake ahead of time?
A: Absolutely! The batter can be made a day in advance and stored in the fridge until you’re ready to steam and bake. The baked cake also keeps well at room temperature for up to 3 days, or in the fridge for up to a week.
Q: What’s the best way to store leftover Coconut Mochi Cake?
A: For maximum freshness, store any leftovers in an airtight container at room temperature for up to 3 days, or in the fridge for up to a week. To soften the cake if it firms up in the fridge, just microwave the squares for 10-15 seconds.
Q: I don’t have a steamer basket – can I bake the Coconut Mochi Cake instead?
A: While steaming is the traditional method for mochi cakes, you can definitely bake this recipe instead. Just steam the batter for 15-20 minutes before transferring it to the oven. The texture will be a bit different, but it will still be delicious.
Coconut Mochi Cake
- Total Time: 55
- Yield: 16
Description
Indulge in the heavenly combination of soft, chewy mochi and the rich, tropical flavor of coconut in this easy-to-make Coconut Mochi Cake. This irresistible dessert is perfect for sharing with friends and family.
Ingredients
– 1 cup sweet rice flour (mochiko)
– 1/2 cup sugar
– 1/4 teaspoon salt
– 1 cup coconut milk
– 1 cup shredded coconut, plus more for topping
Instructions
1. 1. Preheat the oven to 350°F (175°C). Grease an 8-inch square baking pan.
2. 2. In a large bowl, whisk together the sweet rice flour, sugar, and salt.
3. 3. Gradually pour in the coconut milk, stirring constantly, until a smooth batter forms.
4. 4. Fold in the 1 cup of shredded coconut.
5. 5. Pour the batter into the prepared baking pan and spread it evenly.
6. 6. Bake for 40-45 minutes, or until the top is lightly golden and the edges are pulling away from the pan.
7. 7. Remove from the oven and let cool completely in the pan.
8. 8. Once cooled, cut into squares and serve, garnished with additional shredded coconut if desired.
Notes
– For a chewier texture, use 1/4 cup more sweet rice flour.
– Top with a drizzle of coconut caramel sauce or a scoop of vanilla ice cream for an extra indulgent treat.
– Store leftovers in an airtight container at room temperature for up to 3 days.
- Prep Time: 10
- Cook Time: 45
- Category: Snacks & Desserts
- Method: Baking
- Cuisine: Hawaiian
Conclusion
Coconut Mochi Cake is truly a special dessert, with its perfect balance of chewy, pillowy mochi and bold coconut flavor. I hope this recipe helps you capture that same magic I experienced the first time I tried it. Once you taste it, I guarantee it will become a new go-to treat in your household.
So what are you waiting for? Gather your ingredients, fire up your steamer, and get ready to bake up a batch of this irresistible Coconut Mochi Cake. I can’t wait to hear how it turns out for you – be sure to leave a comment and let me know!