
As the crisp winter air fills the streets and the twinkling lights of the season cast a magical glow, my mind can’t help but wander to the iconic Christmas peppermints that have become a cherished part of my holiday traditions. Growing up, I can still vividly remember the way the cool, refreshing flavor would dance on my tongue, transporting me to a world of minty bliss. Every year, my grandma would spend hours carefully crafting her signature Christmas peppermints, meticulously rolling and shaping each one with the utmost care. The sweet aroma would waft through the house, drawing me into the kitchen, where I would eagerly await my chance to lend a helping hand.
As I grew older, those precious moments spent together in the kitchen became some of my most treasured memories. Grandma would patiently teach me the secrets to achieving the perfect Christmas peppermint – the delicate balance of sweetness and cool, the importance of proper tempering, and the art of creating those signature swirls and patterns. It was more than just a recipe; it was a family tradition, a connection to our shared history, and a way to spread the joy of the holiday season.
Why This Christmas Peppermints Recipe Will Become Your Go-To
Now, as I’ve grown into an experienced home cook, I’ve taken those lessons to heart and perfected my own version of Grandma’s beloved Christmas peppermints. This recipe is not just a delicious treat; it’s a labor of love, a way to carry on a cherished tradition, and a means to create lasting memories with loved ones. Whether you’re a seasoned candy maker or a beginner in the kitchen, this Christmas peppermints recipe is sure to become your new go-to for the most wonderful time of the year.
The Secret Behind Perfect Christmas Peppermints
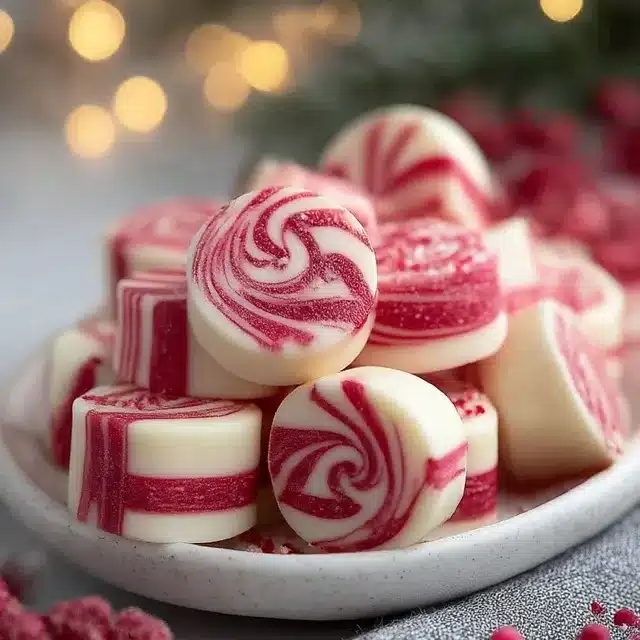
The key to creating truly exceptional Christmas peppermints lies in the perfect balance of flavors and textures. By carefully tempering the chocolate and using a unique combination of peppermint extracts, this recipe delivers a smooth, creamy center with a refreshing, minty kick that will have your taste buds doing a festive dance. Plus, the intricate swirls and patterns add a stunning visual appeal that will make your homemade Christmas peppermints the talk of the holiday season.
Essential Ingredients You’ll Need
- Cocoa Powder: High-quality unsweetened cocoa powder is the foundation of the rich, chocolatey flavor.
- Peppermint Extract: A blend of pure peppermint and spearmint extracts creates the signature Christmas peppermint taste.
- Sweetened Condensed Milk: This luscious dairy ingredient provides the perfect creamy texture and sweetness.
- Powdered Sugar: Finely sifted powdered sugar helps to bind the ingredients and achieve a smooth, polished finish.
- Dark Chocolate: Melted dark chocolate forms the outer shell, balancing the sweetness and adding a sophisticated depth of flavor.
Step-by-Step Christmas Peppermints Instructions
Preparing Your Christmas Peppermints
Get ready to craft your own batch of homemade Christmas peppermints! This recipe is relatively straightforward, with a total preparation and cooking time of around 2 hours. You’ll need a few essential tools, including a double boiler, a silicone baking mat or parchment paper, and a sharp knife for cutting the peppermints into their signature shapes.
1- Begin by combining the cocoa powder, peppermint extract, and sweetened condensed milk in a medium-sized bowl. Mix the ingredients until they are well incorporated and the mixture forms a smooth, creamy paste.
2- In a separate bowl, sift the powdered sugar and gradually add it to the chocolate mixture, stirring continuously until the dough comes together and forms a smooth, pliable ball.
3- Lightly dust a clean surface with powdered sugar and knead the dough for 2-3 minutes, working it until it becomes smooth and easy to handle.
4- Roll the dough out to a thickness of about 1/4 inch, using a rolling pin to ensure an even, consistent shape. Look for a glossy, shiny surface as a visual cue that the dough has been properly tempered.
5- Using a sharp knife or cookie cutters, carefully cut the dough into your desired Christmas peppermint shapes, such as rounds, squares, or candy cane-inspired designs.
6- Gently transfer the shaped peppermints to a parchment-lined baking sheet and refrigerate for at least 30 minutes to allow the shapes to firm up.
Pro Tips for Success
When making Christmas peppermints, the key to success is patience and attention to detail. Be sure to temper the chocolate properly to achieve that perfect glossy sheen, and don’t be afraid to experiment with different peppermint extract blends to find your ideal flavor profile. Additionally, make sure to work quickly when cutting and shaping the peppermints to prevent the dough from becoming too soft and losing its form.
Serving and Storing Your Christmas Peppermints
Perfect Pairings for Christmas Peppermints
Christmas peppermints are the perfect accompaniment to a cozy mug of hot cocoa or a steaming cup of peppermint tea. They also make a delightful addition to holiday cookie platters, adding a pop of festive color and minty freshness. For a truly indulgent experience, try serving the peppermints alongside a rich, creamy eggnog or a glass of sparkling wine.
Storage and Make-Ahead Tips
Christmas peppermints are the perfect make-ahead treat, as they can be stored for up to two weeks in an airtight container at room temperature. For longer-term storage, you can also freeze the peppermints for up to three months. When ready to serve, simply thaw the peppermints at room temperature for a few minutes, and they’ll be ready to enjoy.
Variations and Dietary Adaptations for Christmas Peppermints
Creative Christmas Peppermints Variations
While the classic Christmas peppermint is a time-honored favorite, there’s plenty of room for creativity and experimentation. Try adding a touch of crushed candy cane or a sprinkle of edible glitter for a festive, sparkling effect. For a seasonal twist, incorporate pumpkin spice or gingerbread flavors into the mix. You can also experiment with different shapes, such as stars, trees, or reindeer, to add a unique touch to your homemade Christmas peppermints.
Making Christmas Peppermints Diet-Friendly
For those with dietary restrictions, you can easily adapt this Christmas peppermint recipe to accommodate various needs. To make it gluten-free, simply ensure that all the ingredients you use are certified gluten-free. For a vegan version, substitute the sweetened condensed milk with a plant-based alternative, such as coconut milk or oat milk, and use dairy-free dark chocolate. If you’re following a low-carb lifestyle, you can experiment with sugar-free sweeteners and low-carb chocolate options.
Frequently Asked Questions
Q: Can I use regular mint extract instead of peppermint extract?
A: While you can certainly use regular mint extract, the flavor profile will be quite different from the classic Christmas peppermint taste. Peppermint extract provides a more intense, refreshing flavor that is better suited for this recipe.
Q: How long do the Christmas peppermints need to chill before cutting?
A: It’s best to chill the peppermint dough for at least 30 minutes before cutting it into shapes. This allows the dough to firm up and become more manageable, ensuring that the shapes hold their form.
Q: Can I store the Christmas peppermints in the fridge?
A: While the peppermints can be stored in the fridge, it’s not necessary. Keeping them at room temperature in an airtight container is the best way to preserve their texture and flavor.
Q: How many peppermints does this recipe yield?
A: The yield can vary depending on the size and shape of the peppermints you choose to make. As a general guideline, this recipe will produce approximately 24-30 medium-sized Christmas peppermints.
Q: What should I do if my peppermints start to lose their shape while cutting?
A: If you notice the peppermints starting to lose their shape, simply return the dough to the fridge for 10-15 minutes to firm up again. This will make the dough easier to work with and help maintain the desired shapes.
Christmas Peppermints
- Total Time: 10
- Yield: 24 candies
Description
Indulge in the irresistible minty-fresh flavor of these homemade Christmas Peppermints. These authentic, simple-to-make treats are perfect for holiday parties, gift-giving, or enjoying as a cozy winter treat.
Ingredients
– 12 oz white chocolate, chopped
– 1 tsp peppermint extract
– 2-3 drops red food coloring
– 1/4 cup crushed candy canes
Instructions
1. – In a double boiler or microwave, melt the white chocolate, stirring frequently until smooth.
2. – Remove the melted chocolate from heat and stir in the peppermint extract and food coloring until well combined.
3. – Quickly pour the peppermint-infused chocolate onto a parchment-lined baking sheet and spread it into an even layer.
4. – Sprinkle the crushed candy canes over the top of the chocolate.
5. – Refrigerate for 30 minutes to 1 hour, or until the chocolate has completely hardened.
6. – Break the hardened chocolate into irregular pieces to create the peppermint candies.
7. – Store the Christmas Peppermints in an airtight container in the refrigerator for up to 2 weeks.
Notes
For a fun twist, try adding a sprinkle of crushed candy canes or a drizzle of dark chocolate over the top of the peppermint candies.
- Prep Time: 10
- Category: Snacks & Desserts
- Method: No-Bake
- Cuisine: American
Conclusion
Crafting homemade Christmas peppermints is a beloved tradition that has the power to transport us back to cherished memories and fill our hearts with the warmth of the holiday season. This recipe, inspired by my Grandma’s time-honored techniques, is a true labor of love that will bring joy to your taste buds and create lasting memories with your loved ones. So, gather your ingredients, put on some festive music, and get ready to become a master of the Christmas peppermint. I can’t wait to hear about your delicious creations!