

Christmas was always my favorite time of year growing up, and one of the absolute best parts was making Christmas Cookie Bars with my grandma. It’s a tradition that’s been passed down in our family for generations, and the smell of those buttery, festive bars baking in the oven is a memory I’ll cherish forever.
There’s just something so special about spending that quality time in the kitchen with my grandma, mixing the dough, pressing it into the pan, and then eagerly waiting for them to come out of the oven, fresh and gooey. She’d let me sprinkle the powdered sugar on top, and I can still picture the look of pure joy on her face as we’d dig in and savor that first delicious bite. To this day, Christmas Cookie Bars remind me of those precious moments and bring me right back to the warmth and coziness of my grandma’s kitchen.
Why This Christmas Cookie Bars Recipe Will Become Your Go-To
The Secret Behind Perfect Christmas Cookie Bars
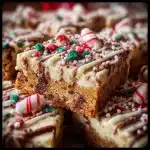
What makes this Christmas Cookie Bars recipe so special is the unique blend of flavors and textures. The buttery, shortbread-like base is the perfect canvas for the rich, chocolatey topping, which gets a festive twist from the addition of crushed candy canes. The end result is a decadent, crowd-pleasing treat that’s sure to become a holiday staple in your household.
The secret is in the simple yet ingenious technique of melting the chocolate and candy canes together to create a smooth, glossy glaze that sets up beautifully. This gives you that irresistible layered look and texture, with the chocolate and candy cane flavors perfectly complementing the nutty, buttery crust. Plus, it’s all baked in one pan, making it an effortless and foolproof holiday dessert.
Essential Ingredients You’ll Need
– Unsalted butter: The foundation of the rich, buttery crust.
– Granulated sugar: Sweetens the base and helps create the perfect texture.
– All-purpose flour: Provides structure and binds the dough together.
– Salt: Enhances the overall flavor and balances the sweetness.
– Semi-sweet chocolate chips: The star of the show, melted down into a smooth, glossy topping.
– Crushed candy canes: Adds a festive touch and minty contrast to the chocolate.
Step-by-Step Christmas Cookie Bars Instructions
Preparing Your Christmas Cookie Bars
These Christmas Cookie Bars are a breeze to make, with just a few simple steps. You’ll need a 9×13 baking pan, a mixing bowl, and a few kitchen tools, but other than that, it’s an easy, one-pan recipe that comes together quickly. In total, you’re looking at about 45 minutes of hands-on time, plus an hour of baking and cooling.
1- Preheat your oven to 350°F and grease a 9×13 baking pan with butter or non-stick cooking spray.
2- In a large mixing bowl, cream together the softened butter and granulated sugar until light and fluffy.
3- Add in the all-purpose flour and salt, and mix until a cohesive dough forms.
4- Press the dough evenly into the prepared baking pan, making sure to reach all the corners.
5- Bake the crust for 20-25 minutes, until lightly golden brown.
6- Allow the crust to cool completely before topping with the chocolate and candy cane glaze.
Pro Tips for Success
The key to perfect Christmas Cookie Bars is to not overbake the crust. You want it to be firm and golden, but not too crisp or dry. Keep a close eye on it in the oven, and don’t be afraid to pull it out a minute or two early if the edges are starting to brown too quickly.
Another pro tip is to use high-quality chocolate chips and freshly crushed candy canes for the topping. The better the ingredients, the more flavorful and indulgent your Christmas Cookie Bars will be. And be sure to let the bars cool completely before slicing – this will ensure clean, neat cuts.
Serving and Storing Your Christmas Cookie Bars
Perfect Pairings for Christmas Cookie Bars
These Christmas Cookie Bars are the ultimate holiday treat, but they also make a wonderful accompaniment to so many other festive favorites. Serve them alongside a steaming mug of hot cocoa or mulled wine for a cozy, indulgent pairing. They also pair beautifully with a scoop of peppermint ice cream or a dollop of freshly whipped cream.
For a festive holiday party, arrange the Christmas Cookie Bars on a platter alongside other Christmas cookies, fudge, and candied nuts. They’re sure to be a hit with guests of all ages.
Storage and Make-Ahead Tips
Fortunately, Christmas Cookie Bars are a great make-ahead dessert. Once cooled completely, you can store them in an airtight container at room temperature for up to 5 days. They also freeze beautifully for up to 3 months. Simply thaw at room temperature before serving.
If you want to get a head start on your holiday baking, you can even make the crust up to 3 days in advance and store it, unbaked, in the refrigerator. Then, when you’re ready to assemble, just press the chilled dough into the pan and bake as directed.
Variations and Dietary Adaptations for Christmas Cookie Bars
Creative Christmas Cookie Bars Variations
While the classic chocolate and candy cane version is hard to beat, there are so many delicious ways to switch up this Christmas Cookie Bars recipe. Try swapping the candy canes for crushed peppermint or holiday M&Ms for a fun, colorful twist. You could also use white chocolate chips or a blend of milk and dark chocolate for a richer, creamier topping.
For a nutty variation, fold in chopped pecans or walnuts to the crust. Or, add a layer of caramel or dulce de leche between the crust and chocolate topping for an extra decadent treat.
Making Christmas Cookie Bars Diet-Friendly
To make these Christmas Cookie Bars gluten-free, simply swap the all-purpose flour for a 1-to-1 gluten-free flour blend. For a dairy-free version, use vegan butter or coconut oil in place of the regular butter, and opt for dairy-free chocolate chips.
You can also make a lower-carb and keto-friendly version by using a sugar substitute like erythritol or monk fruit sweetener in the crust, and sugar-free chocolate chips and crushed sugar-free peppermint candies in the topping.
Frequently Asked Questions
Q: Can I use milk chocolate instead of semi-sweet chocolate chips?
A: Absolutely! Milk chocolate will create a sweeter, creamier topping, which can be a delicious alternative to the semi-sweet version. Just keep in mind that milk chocolate tends to be softer, so you may need to refrigerate the bars to help the topping set up firmly.
Q: How long do I need to bake the crust?
A: The crust should bake for 20-25 minutes, until it’s lightly golden brown. Keep a close eye on it towards the end to prevent over-baking, as you want the crust to still have a bit of softness to it.
Q: Can I make these Christmas Cookie Bars ahead of time?
A: Yes, these bars are a great make-ahead dessert. You can store them in an airtight container at room temperature for up to 5 days, or freeze them for up to 3 months. Just be sure to let them thaw completely before serving.
Q: How many people does this recipe serve?
A: This recipe makes one 9×13 pan of Christmas Cookie Bars, which can be cut into 24 generous servings. Adjust the recipe accordingly if you need to feed a larger crowd.
Q: What if the chocolate topping doesn’t set up properly?
A: If the chocolate topping seems too soft or doesn’t set as firmly as you’d like, simply pop the pan in the refrigerator for 30 minutes to an hour. The chilled temperature will help the chocolate firm up beautifully.
Christmas Cookie Bars
- Total Time: 45
- Yield: 16 bars
Description
Indulge in the rich, buttery goodness of these mouthwatering Christmas Cookie Bars, packed with festive flavors and guaranteed to become an unforgettable holiday tradition.
Ingredients
– 1 cup unsalted butter, softened
– 1 cup granulated sugar
– 2 large eggs
– 2 teaspoons vanilla extract
– 2 cups all-purpose flour
– 1 teaspoon baking powder
– 1/2 teaspoon salt
– 1 cup semi-sweet chocolate chips
– 1/2 cup crushed candy canes or holiday sprinkles
Instructions
1. – Preheat oven to 350°F. Grease an 8×8-inch baking pan.
2. – In a large bowl, cream together the butter and sugar until light and fluffy.
3. – Beat in the eggs one at a time, then stir in the vanilla.
4. – In a separate bowl, whisk together the flour, baking powder, and salt.
5. – Gradually mix the dry ingredients into the wet ingredients until just combined.
6. – Fold in the chocolate chips and crushed candy canes or sprinkles.
7. – Spread the batter evenly into the prepared baking pan.
8. – Bake for 25-30 minutes, until a toothpick inserted in the center comes out clean.
9. – Allow the bars to cool completely before cutting into squares.
Notes
For a festive touch, top the cooled bars with additional crushed candy canes or holiday-themed sprinkles.
- Prep Time: 15
- Cook Time: 30
- Category: Dessert
- Method: Baking
- Cuisine: American
Conclusion
There’s truly nothing quite like the festive, nostalgic flavor of homemade Christmas Cookie Bars. This recipe is a guaranteed crowd-pleaser, with its rich, chocolatey topping, minty crunch, and buttery, shortbread-like base. Plus, it’s an absolute breeze to make – no complicated techniques or hard-to-find ingredients required.
I hope this Christmas Cookie Bars recipe becomes a new holiday tradition in your home, just as it has been in mine. Bake up a batch, share them with loved ones, and savor every bite of that delicious, seasonal indulgence. Merry Christmas!