
Attention all bread lovers! Are you ready to elevate your baking game and tantalize your taste buds with a timeless classic? Look no further than the irresistible butter bread recipe. This beloved staple has graced tables across cultures and generations, captivating hearts with its tender crumb and rich, buttery flavor. Whether you’re a seasoned baker or a curious novice, this recipe is your gateway to creating a masterpiece that will leave your kitchen filled with the comforting aroma of freshly baked bread. Get ready to embark on a delightful culinary journey as we guide you through the steps to craft the perfect loaf of butter bread that will have everyone clamoring for more.

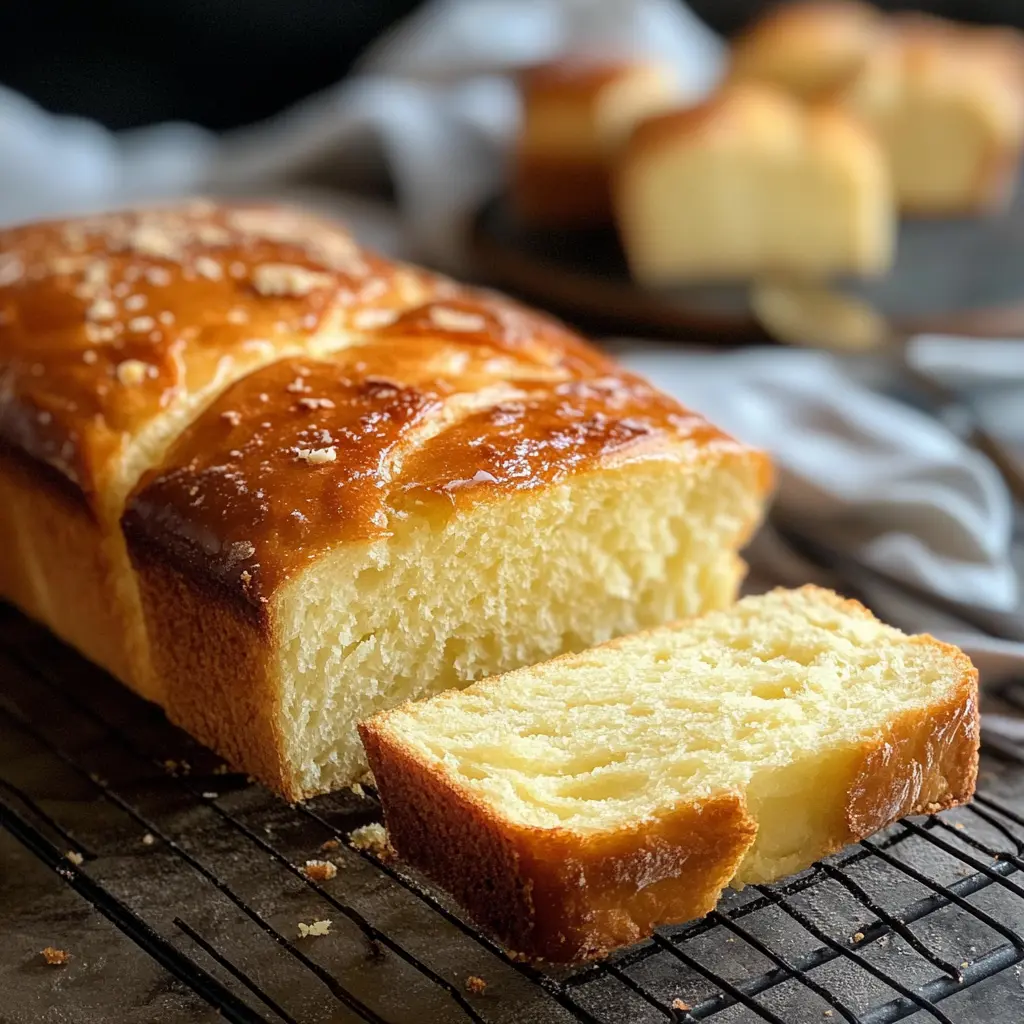
Butter bread, also known as milk bread or Hokkaido milk bread, is a soft, fluffy, and slightly sweet bread that originated in Japan. Its distinctive texture and flavor have made it a beloved staple in Asian bakeries and households. The secret to its irresistible quality lies in the use of a tangzhong starter, a cooked mixture of flour and milk that enhances the bread’s moistness and shelf life.
Ingredients and Equipment
To create this heavenly bread, you’ll need:
- 2 1/2 cups bread flour
- 1/2 cup whole milk
- 1/4 cup sugar
- 2 tsp instant yeast
- 1 tsp salt
- 4 tbsp unsalted butter, softened
Ensure you have the following equipment:
- Stand mixer with a dough hook attachment
- 9×5-inch loaf pan
- Oven
Butter Bread Recipe Preparation Steps
Step 1: Mixing the Dough
In the bowl of your stand mixer, combine the flour, milk, sugar, yeast, and salt. Mix on low speed until the ingredients are well incorporated. Gradually add the softened butter, one tablespoon at a time, while the mixer is running. Continue kneading the dough on medium speed for 8-10 minutes until it becomes smooth, elastic, and pulls away from the sides of the bowl.
Mixing the dough properly is crucial for achieving the desired texture and structure of your butter bread. As you mix the dry ingredients, make sure they are evenly distributed before adding the wet ingredients. When adding the softened butter, do so gradually to allow it to incorporate evenly into the dough without compromising its structure. As you knead the dough, you may need to scrape down the sides of the bowl occasionally to ensure all the ingredients are well combined.
The kneading process is essential for developing the gluten network in the dough, which gives the bread its signature texture and rise. You’ll know the dough is ready when it becomes smooth, elastic, and pulls away from the sides of the bowl. If you’re kneading by hand, this process may take a bit longer, around 12-15 minutes. To test if the dough is properly kneaded, perform the windowpane test: take a small piece of dough and stretch it between your fingers. If it can stretch thin enough to allow light to pass through without tearing, your dough is ready for the first rise.
Step 2: First Rise
Transfer the dough to a lightly greased bowl, cover it with a damp kitchen towel or plastic wrap, and let it rise in a warm, draft-free area for about 1 hour or until it doubles in size. The ideal temperature for rising is around 75°F (24°C). You’ll know the dough is ready when you gently press your finger into it, and the indentation remains.
The first rise, also known as bulk fermentation, is a crucial step in developing the bread’s flavor and texture. As the dough rests, the yeast consumes the sugar and releases carbon dioxide, causing the dough to expand and develop its characteristic flavor. It’s essential to provide the dough with a warm, draft-free environment to encourage optimal yeast activity. If your kitchen is on the cooler side, you can create a warm spot by placing the bowl in a slightly preheated oven (turned off) or on top of a refrigerator.
Covering the dough during the rise is important to prevent it from drying out and developing a skin, which can hinder its expansion. A damp kitchen towel or plastic wrap will help maintain moisture and keep the dough’s surface soft and pliable. When checking if the dough has doubled in size, refrain from poking or prodding it too much, as this can cause the delicate gluten network to deflate. Instead, gently press your finger into the dough; if the indentation remains, it’s ready for the next step.
Step 3: Shaping the Dough
Punch down the risen dough to release the air and divide it into equal portions, depending on your desired loaf size or if you prefer rolls. Shape each portion into a smooth ball and place them in a greased loaf pan, seam-side down.
After the first rise, the dough will have doubled in size and feel soft and airy. Gently punch down the dough to release the built-up gas and distribute the yeast evenly throughout the dough. This step also helps relax the gluten, making the dough easier to shape.
When dividing the dough, use a sharp knife or a bench scraper to ensure clean, even portions. The number of portions will depend on your preferred loaf size or if you’d like to make rolls instead. For a standard 9×5-inch loaf pan, dividing the dough into three equal portions works well.
To shape the dough into smooth balls, take each portion and gently fold the edges towards the center, creating a tight, smooth surface. Place the shaped dough balls into a greased loaf pan, seam-side down, allowing some space between each ball for expansion during the second rise. If making rolls, place the shaped dough balls on a lined baking sheet, leaving enough space between them for growth.
Butter Bread Recipe Baking Process
Step 1: Second Rise
Cover the shaped dough in the loaf pan with a damp kitchen towel or plastic wrap and let it rise again for about 45 minutes to 1 hour, or until it doubles in size. Ensure the dough rises in a warm, draft-free area for optimal results.
The second rise, also known as proofing, allows the shaped dough to expand further and develop its final structure before baking. As with the first rise, it’s crucial to provide a warm, draft-free environment to encourage yeast activity. Covering the dough prevents it from drying out and developing a skin that could impede its growth.
During this stage, the dough will continue to rise and fill the loaf pan, creating a domed top. Keep an eye on the dough’s progress, as over-proofing can lead to a collapsed or misshapen loaf. The dough is ready for baking when it has doubled in size and feels light and puffy to the touch. To test if it’s ready, gently press your finger into the dough; if the indentation slowly springs back, it’s time to bake.
Step 2: Baking the Loaves
Preheat your oven to 375°F (190°C). Once the dough has completed its second rise, gently brush the top with milk or egg wash for a golden, shiny crust. Bake the bread for 30-35 minutes, or until the top turns a rich golden brown color. To check if the bread is fully baked, tap the bottom of the loaf; it should sound hollow. Alternatively, insert a thermometer into the center of the loaf; it should read 190°F (88°C) when done.
Before baking, ensure your oven is fully preheated to the correct temperature. This step is essential for achieving even baking and a well-risen loaf. Brushing the top of the dough with milk or egg wash before baking helps create a beautiful, golden-brown crust and adds a subtle shine to the finished product.
As the bread bakes, resist the urge to open the oven door too frequently, as this can cause the temperature to fluctuate and affect the bread’s rise. Instead, rely on visual cues, such as the color of the crust, to gauge the bread’s progress. If you notice the top browning too quickly, you can tent the loaf with aluminum foil to prevent burning.
To ensure your butter bread is fully baked, there are a few methods you can use. Tapping the bottom of the loaf and listening for a hollow sound is a traditional technique that indicates the bread is done. Alternatively, using a thermometer to check the internal temperature of the loaf is a more precise method. When the center of the bread reaches 190°F (88°C), it is fully baked and ready to be removed from the oven.
Once your butter bread is done, remove it from the oven and let it cool in the pan for about 5 minutes before transferring it to a wire rack to cool completely. Allowing the bread to cool before slicing is important, as cutting into a hot loaf can cause the texture to become gummy and less enjoyable. Patience is key!
Butter Bread Recipe Tips and Tricks
- For a wholesome twist, substitute half of the bread flour with whole wheat flour.
- Enhance the flavor by adding herbs like rosemary or thyme, or fold in some shredded cheese for a savory treat.
- If your bread turns out dense, it may be due to under-kneading or over-proofing. Ensure you knead the dough until it passes the windowpane test and keep an eye on the rise times.
- To achieve even baking, rotate the loaf pan halfway through the baking process.
Serving Suggestions
Butter bread is incredibly versatile and pairs well with a variety of spreads and toppings. Try it with:
- Butter and jam for a classic breakfast combo
- Nutella or peanut butter for a sweet and indulgent treat
- Sliced deli meats and cheese for a satisfying sandwich
- Garlic butter for a savory side dish
Storage and Freezing
To keep your butter bread fresh, store it in an airtight container or plastic bag at room temperature for up to 3 days. For longer storage, slice the bread and place it in a freezer-safe bag, removing as much air as possible. Freeze for up to 3 months and thaw at room temperature or in the toaster when ready to enjoy.
Butter Bread Recipe Q&A
Q: How can I tell if my butter bread is fully baked?
A: Tap the bottom of the loaf; it should sound hollow. Alternatively, insert a thermometer into the center; it should read 190°F (88°C) when done.
Q: Can I use salted butter instead of unsalted?
A: While you can use salted butter, it’s best to stick with unsalted to have better control over the salt content in your bread.
Q: How can I make this recipe vegan?
A: Substitute the whole milk with your preferred plant-based milk and use vegan butter or coconut oil instead of regular butter.
Q: Can I add other ingredients to the dough?
A: Absolutely! Try adding raisins, dried cranberries, or chocolate chips for a sweet twist, or mix in some shredded cheese, herbs, or garlic for a savory version.
Q: What’s the best way to store butter bread?
A: Store the bread in an airtight container or plastic bag at room temperature for up to 3 days, or slice and freeze for up to 3 months.
Q: Can I make this recipe in a bread machine?
A: Yes, you can! Follow your bread machine’s instructions for the order of adding ingredients and select the appropriate settings for a sweet bread or milk bread.
Conclusion
Congratulations on mastering the art of making butter bread! This timeless butter bread recipe is a testament to the joy and comfort that homemade bread brings to our lives. With its soft, fluffy texture and rich, buttery flavor, this bread is sure to become a staple in your kitchen. Whether enjoyed on its own, as a side dish, or as the foundation for a delicious sandwich, butter bread is a versatile and beloved classic that will never go out of style. So go ahead, slice into your freshly baked loaf, and savor the fruits of your labor. Share your creation with friends and family, and watch as they marvel at your baking prowess. Happy baking!