
Blackberries have always held a special place in my heart. Growing up, my grandma had the most incredible blackberry bushes in her backyard, and every summer, the entire family would gather to pick the ripe, juicy berries. The smell of warm blackberries just-picked from the vine is a memory I’ll cherish forever. As a kid, I’d spend hours meticulously washing and sorting the berries, dreaming of the blackberry jam we’d make together. Grandma’s secret recipe was the stuff of legends, and now, I’m excited to share it with you.
Why This blackberry jam recipe Recipe Will Become Your Go-To
This blackberry jam recipe is truly special. It’s the perfect balance of sweet and tart, with a smooth, spreadable texture that will have you coming back for more. What sets it apart is the careful attention to detail – from the perfectly ripened blackberries to the gentle cooking process that preserves the fruit’s natural flavors. This isn’t your average blackberry jam; it’s a labor of love that’s worth every minute.
The Secret Behind Perfect blackberry jam recipe
The secret to this blackberry jam recipe lies in the way the ingredients are handled. First and foremost, the blackberries must be at the peak of ripeness. Overripe berries can result in a jam that’s too sweet and lacking in that lovely tart punch, while underripe ones will leave you with a lackluster spread. I’ve perfected the art of selecting the right blackberries, ensuring each batch is bursting with flavor.
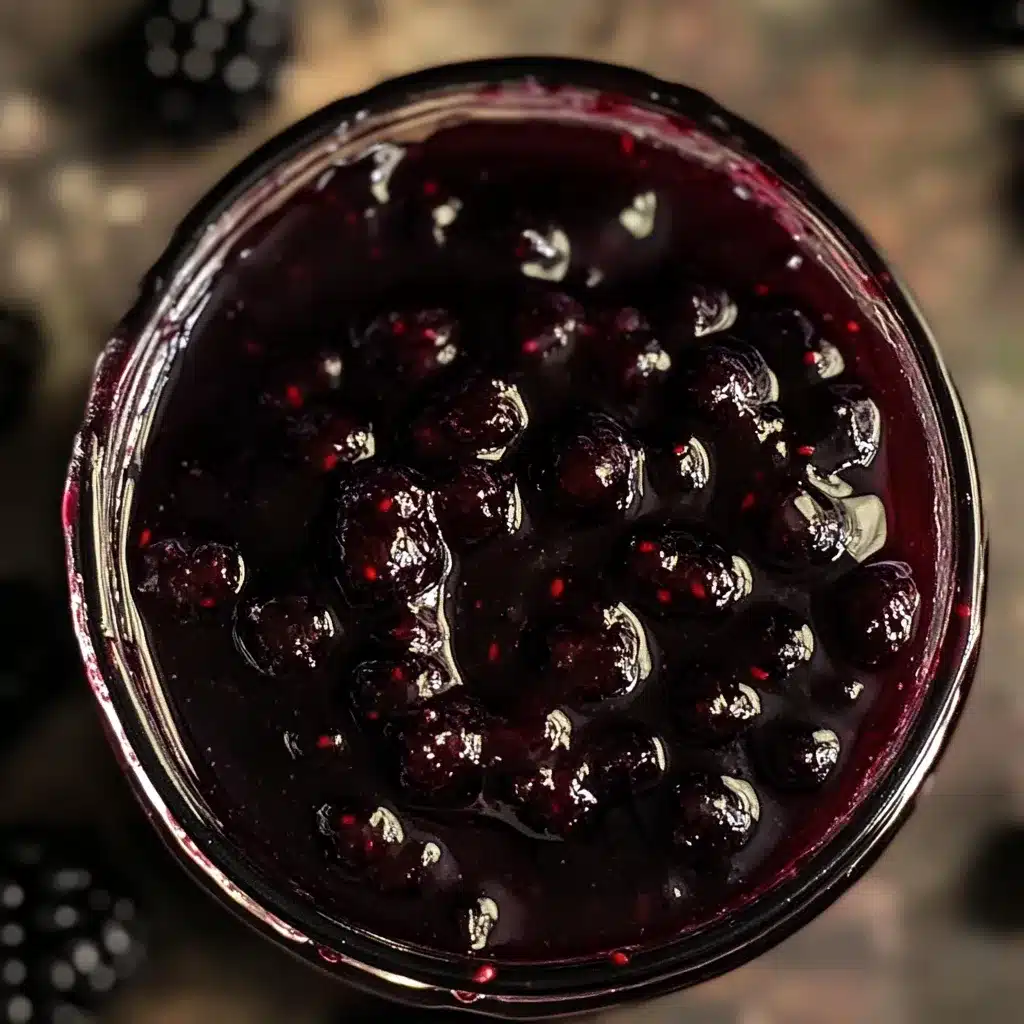
But it’s not just about the berries themselves – the cooking method is crucial, too. Many blackberry jam recipes call for a lengthy simmering process that can dull the fruit’s natural brightness. This recipe, on the other hand, uses a gentle, low-and-slow approach that allows the flavors to slowly meld together without sacrificing that vibrant, almost-purple hue. The result is a jam that’s rich, velvety, and utterly irresistible.
Essential Ingredients You’ll Need
– Blackberries: The star of the show! Look for plump, juicy blackberries at the peak of ripeness.
– Granulated sugar: This helps to balance the tartness of the blackberries and create that perfect jam consistency.
– Lemon juice: A touch of lemon brightens up the flavor and helps the jam set properly.
– Vanilla extract: Just a splash adds a lovely depth of flavor.
– Unsalted butter: A small amount of butter helps to create a smooth, glossy texture.
Step-by-Step blackberry jam recipe Instructions
Preparing Your blackberry jam recipe
This blackberry jam recipe is surprisingly simple to make, but it does require a bit of time and attention. The total time from start to finish is about 1 hour and 15 minutes, with most of that being hands-off simmering time. You’ll need a large, heavy-bottomed saucepan or Dutch oven, a wooden spoon, and a few jars or containers for storing the finished jam.
1- Start by gently rinsing the blackberries in a colander and patting them dry with a clean kitchen towel. Discard any berries that are overly soft or damaged.
2- In the saucepan, combine the blackberries, sugar, lemon juice, and vanilla extract. Bring the mixture to a gentle simmer over medium heat, stirring occasionally, until the sugar has fully dissolved.
3- Once the sugar has dissolved, reduce the heat to low and let the jam simmer, stirring occasionally, for 45-55 minutes. The jam should thicken and reduce by about half during this time.
4- Keep a close eye on the jam, adjusting the heat as needed to maintain a gentle simmer. You’ll know it’s ready when the mixture has a rich, deep purple color and a glossy, spreadable consistency.
5- Remove the saucepan from the heat and stir in the butter until it’s fully incorporated. This final step adds a beautiful shine and silky texture to the jam.
6- Carefully transfer the hot blackberry jam to clean, sterilized jars or containers. Seal the lids and allow the jam to cool completely before refrigerating.
Pro Tips for Success
The key to perfect blackberry jam is patience and attention to detail. Don’t be tempted to rush the simmering process – low and slow is the way to go for maximum flavor and texture. Also, be sure to use the freshest, ripest blackberries you can find for the best results.
Another pro tip? Let the jam cool completely before tasting. The flavors will continue to develop and meld together as it sets. And if you find the jam is a bit too tart for your liking, don’t hesitate to add a touch more sugar to balance it out.
Serving and Storing Your blackberry jam recipe
Perfect Pairings for blackberry jam recipe
This blackberry jam recipe is truly versatile. Spread it on warm buttery toast for a classic breakfast treat, or use it as a filling for thumbprint cookies or linzer bars. It also makes a delightful accompaniment to a cheese board, paired with creamy brie or tangy goat cheese.
For a simple dessert, try swirling a spoonful of the jam into plain yogurt or vanilla ice cream. Or, use it as a topping for pancakes, waffles, or even vanilla cake. The possibilities are endless!
Storage and Make-Ahead Tips
Properly stored, this blackberry jam recipe will keep in the refrigerator for up to 3 weeks. Be sure to transfer the cooled jam to airtight containers or jars with tight-fitting lids. For longer-term storage, the jam can be frozen for up to 6 months.
If you’d like to get a head start on your jam-making, you can prepare the recipe in advance. Simply follow the instructions up to the point of transferring the jam to jars, then allow it to cool completely before refrigerating or freezing. When you’re ready to serve, just thaw the jam in the fridge (if frozen) and give it a good stir before using.
Variations and Dietary Adaptations for blackberry jam recipe
Creative blackberry jam recipe Variations
While this classic blackberry jam recipe is hard to beat, there are plenty of ways to put your own spin on it. Try adding a touch of cinnamon or cardamom for a warm, spiced twist. Or, swap out the vanilla extract for almond or orange extract for a different flavor profile.
You could also experiment with different types of sweeteners, such as honey or maple syrup, in place of the granulated sugar. And for a bit of crunch, fold in some toasted nuts or seeds just before jarring the jam.
Making blackberry jam recipe Diet-Friendly
This blackberry jam recipe can be easily adapted to suit a variety of dietary needs. For a low-sugar version, simply reduce the amount of granulated sugar by half and use a sugar-free sweetener like stevia or erythritol instead.
To make the jam vegan, replace the butter with a plant-based alternative like coconut oil or vegan margarine. And for a gluten-free option, be sure to use the jam on gluten-free breads, crackers, or baked goods.
Frequently Asked Questions
Q: Can I use frozen blackberries instead of fresh?
A: Absolutely! Frozen blackberries work perfectly well in this recipe. Just be sure to thaw them completely and pat them dry before using.
Q: How can I tell when the jam is done simmering?
A: The jam is ready when it has thickened and reduced by about half, and the color has deepened to a rich, almost-purple hue. You’ll also notice that the mixture coats the back of a spoon in a smooth, glossy layer.
Q: Can I double or triple this recipe?
A: Yes, you can easily scale up this blackberry jam recipe to make larger batches. Just be sure to use a larger pot and adjust the simmering time accordingly, as larger volumes may take a bit longer to reach the perfect consistency.
Q: My jam turned out too runny. What can I do?
A: If your blackberry jam is a bit on the thin side, try simmering it for a few more minutes to allow more of the liquid to evaporate. You can also try adding a touch more sugar, which will help the jam set up better.
Q: Can I use this jam for canning or preserving?
A: Absolutely! This blackberry jam recipe is perfect for canning and long-term storage. Just be sure to follow proper canning techniques to ensure a safe, shelf-stable product.
Conclusion
I hope this blackberry jam recipe becomes a new family favorite in your home, just as it has been in mine. The sweet-tart flavor, velvety texture, and vibrant color make it a true delight to behold and savor. Whether you’re spreading it on toast, swirling it into yogurt, or using it as a filling in your baked goods, this jam is sure to become a staple in your kitchen.
So what are you waiting for? Gather up those beautiful blackberries and let’s get jammin’! I can’t wait to hear how your batch turns out. Be sure to leave a comment and let me know your thoughts. Enjoy!