
Growing up, berry crisp recipe was a summertime staple in our household. I can still vividly remember the aroma of juicy berries and buttery crumble wafting through the kitchen as my grandma pulled the warm, golden-brown dish out of the oven. The way the tart, slightly sweet fruit melted on my tongue, balanced by the satisfying crunch of the topping – it was pure bliss.
Those childhood memories are what inspired me to perfect my own berry crisp recipe over the years. I’ve experimented with different berry combinations, flavor profiles, and baking techniques, all in pursuit of creating the ultimate comfort food dessert. And after countless test batches, I’m thrilled to share the recipe that has become a true family favorite.
Why This berry crisp recipe Recipe Will Become Your Go-To
The Secret Behind Perfect berry crisp recipe
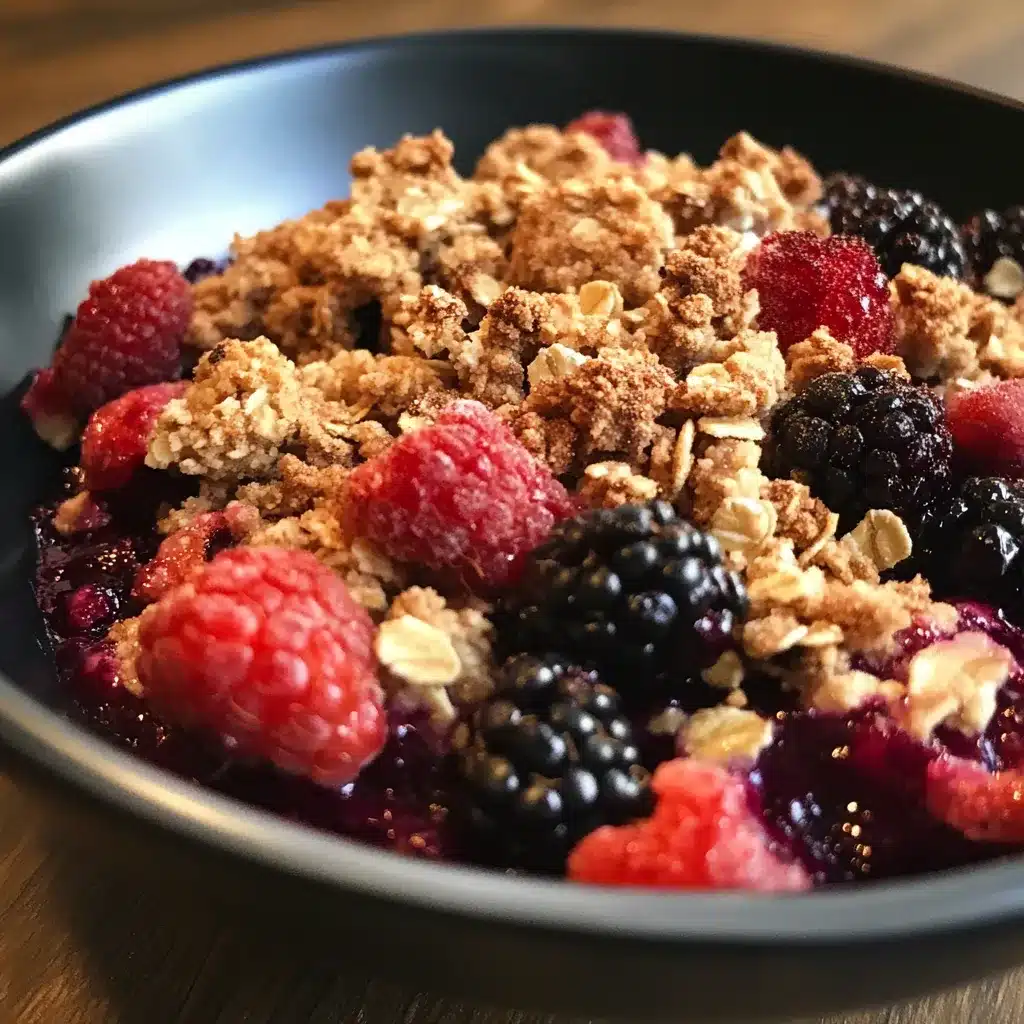
What sets this berry crisp recipe apart is the perfect balance of flavors and textures. The filling is bursting with a medley of juicy berries – think plump raspberries, sweet blueberries, and tangy blackberries – that are complemented by a touch of brown sugar and a hint of cinnamon. The topping is where things get really special, though. Instead of a typical crumble, I use a combination of oats, flour, butter, and brown sugar to create a delightfully crisp, almost cookie-like topping that adds an irresistible crunch to every bite.
The secret to achieving that signature texture lies in the way you handle the topping ingredients. By cutting the cold butter into the dry mixture using a pastry cutter or two forks, you create pea-sized pieces that will melt and caramelize in the oven, resulting in a topping that’s both crisp and tender. And the addition of old-fashioned oats not only provides a lovely nutty flavor, but also helps the topping hold its shape and prevent it from becoming too greasy.
Trust me, once you try this berry crisp recipe, you’ll be hooked. It’s the perfect balance of sweet and tart, with a texture that’s simply out of this world. Your family and friends are going to love it.
Essential Ingredients You’ll Need
– Fresh berries: A mix of raspberries, blueberries, and blackberries works beautifully, but you can also use just one type of berry or experiment with other varieties like strawberries or boysenberries.
– Brown sugar: This adds depth of flavor and helps the berries caramelize as they bake.
– Cornstarch: A small amount of cornstarch helps thicken the berry filling and prevent it from becoming too watery.
– Cinnamon: Just a pinch of ground cinnamon complements the berry flavors perfectly.
– Unsalted butter: Cold butter is essential for creating the perfect crumbly topping.
– All-purpose flour: Combined with the oats, the flour helps bind the topping ingredients together.
– Old-fashioned oats: These provide the signature crispy texture and nutty flavor in the topping.
Step-by-Step berry crisp recipe Instructions
Preparing Your berry crisp recipe
This berry crisp recipe is surprisingly easy to make, with a total active time of just about 30 minutes. You’ll need a 9×13-inch baking dish, a mixing bowl, a pastry cutter or two forks, and a few basic kitchen tools. Once you’ve gathered your ingredients, preheat your oven to 375°F and let’s get started!
1- Start by gently rinsing the berries and patting them dry with a paper towel. In a large mixing bowl, combine the berries, brown sugar, cornstarch, and cinnamon. Toss everything together until the berries are evenly coated.
2- Next, make the topping. In a separate bowl, combine the flour, oats, and a pinch of salt. Cut in the cold butter using a pastry cutter or two forks until the mixture resembles coarse crumbs with pea-sized pieces of butter.
3- Transfer the berry mixture to your prepared baking dish, spreading it out in an even layer. Sprinkle the oat topping evenly over the top, making sure to cover the entire surface.
4- Bake the berry crisp for 30-35 minutes, until the topping is golden brown and the berry juices are bubbling up around the edges. Keep an eye on it towards the end, as you want the topping to be crisp but not burnt.
5- Remove the berry crisp from the oven and let it cool for at least 15 minutes before serving. This allows the filling to thicken up and the topping to set.
6- Scoop generous portions of the warm berry crisp into bowls and top with a dollop of vanilla ice cream or a drizzle of heavy cream, if desired. Enjoy the perfect balance of sweet, tart, and crunchy in every bite!
Pro Tips for Success
– For the best texture, use a mix of different berries rather than just one type. The variety of flavors and colors makes for a more interesting and delicious dessert.
– Be sure to coat the berries in the sugar and cornstarch mixture thoroughly so the filling doesn’t become too watery as it bakes.
– Don’t over-mix the topping – you want to maintain those pea-sized pieces of butter for the perfect crispy texture.
– Keep a close eye on the berry crisp towards the end of baking to prevent the topping from burning.
– Resist the urge to dig in right away – letting the berry crisp cool for at least 15 minutes allows the filling to thicken up beautifully.
Serving and Storing Your berry crisp recipe
Perfect Pairings for berry crisp recipe
This berry crisp recipe is the ultimate summertime dessert, but it’s also a year-round crowd-pleaser. Serve it warm with a scoop of creamy vanilla ice cream or a dollop of freshly whipped cream for a classic pairing. It also pairs beautifully with a scoop of tangy lemon sorbet or a drizzle of caramel sauce for a more decadent treat.
For a simple yet elegant presentation, garnish the berry crisp with a sprig of fresh mint or a dusting of powdered sugar. It’s the perfect ending to a backyard barbecue, a picnic in the park, or a cozy family dinner.
Storage and Make-Ahead Tips
Leftover berry crisp can be stored in an airtight container in the refrigerator for up to 4 days. To reheat, simply pop it back in the oven at 350°F for 10-15 minutes until warmed through.
You can also make this recipe ahead of time and freeze it for later. Bake the berry crisp as directed, then let it cool completely. Cover the dish tightly with plastic wrap and aluminum foil, and freeze for up to 3 months. When ready to serve, thaw the berry crisp in the refrigerator overnight, then reheat it in the oven until heated through.
For an even quicker option, you can prepare the berry filling and the topping separately in advance. Store the filling in an airtight container in the fridge, and the topping in a resealable bag in the freezer. When you’re ready to bake, simply assemble the crisp and pop it in the oven.
Variations and Dietary Adaptations for berry crisp recipe
Creative berry crisp recipe Variations
While this classic berry crisp recipe is simply delicious as-is, there are so many ways to put your own spin on it. Try swapping in different types of berries, like strawberries, blackberries, or even a mix of fresh and frozen fruit. You can also experiment with unique flavor combinations, like adding a touch of lemon zest to the filling or using a blend of spices like ginger, cardamom, or nutmeg in the topping.
For a fun twist, you can even turn this berry crisp into individual servings by baking it in ramekins or mini-muffin tins. This makes for a beautiful presentation and ensures everyone gets their own perfectly portioned dessert.
Making berry crisp recipe Diet-Friendly
If you’re looking to make this berry crisp recipe a bit more diet-friendly, there are a few simple swaps you can try. For a gluten-free version, use a 1:1 gluten-free flour blend in place of the all-purpose flour, and opt for certified gluten-free oats.
To make a vegan berry crisp, replace the butter in the topping with coconut oil or vegan butter. You can also use a plant-based milk, like almond or oat milk, in place of the cream or ice cream toppings.
For a lower-carb take, reduce the amount of brown sugar in the filling and use a granulated sugar substitute instead. You can also replace some of the oats in the topping with ground nuts or seeds to add healthy fats and protein.
No matter which variations or dietary adaptations you choose, this berry crisp recipe is sure to be a hit. The key is to have fun and experiment with different flavors and techniques to make it your own.
Frequently Asked Questions
Q: Can I use frozen berries instead of fresh?
A: Absolutely! Frozen berries work great in this recipe. Just be sure to thaw them completely and pat them dry before tossing them with the sugar and cornstarch. The baking time may need to be adjusted slightly, so keep an eye on it.
Q: How do I know when the berry crisp is done baking?
A: The berry crisp is ready when the topping is golden brown and the berry juices are bubbling up around the edges of the dish. You can also test it by inserting a toothpick or knife into the center – it should come out clean, with no raw batter clinging to it.
Q: Can I make this recipe ahead of time?
A: Absolutely! This berry crisp recipe is perfect for making in advance. You can prepare the filling and topping separately and store them in the fridge or freezer until you’re ready to assemble and bake. You can also bake the entire dish in advance and reheat it before serving.
Q: How much does this recipe serve?
A: This berry crisp recipe is baked in a 9×13-inch baking dish and should serve 8-10 people, depending on portion size. If you’d like to make a smaller batch, you can easily halve the recipe and bake it in an 8×8-inch dish.
Q: What if my topping isn’t crispy enough?
A: If your berry crisp topping isn’t as crisp as you’d like, try broiling it for the last 2-3 minutes of baking. Keep a close eye on it to prevent burning. You can also try adding a bit more flour or oats to the topping mixture next time.
Conclusion
There’s nothing quite like the irresistible combination of juicy berries and crisp, buttery topping in a homemade berry crisp. This recipe is sure to become a new family favorite, whether you’re serving it up for a summer barbecue or a cozy winter gathering.
I hope you’ll give this berry crisp a try and let me know what you think. Share your photos and feedback in the comments – I’d love to hear how it turns out for you. Enjoy!